Flyweb Documentation v1.5
Thank you for purchasing Flyweb Theme! This is the documentation that will help you with customizing and orienting in the theme.
Important! This is a WordPress theme!
Getting started
Before you dive into code, you we want you to explain how the theme is structured and organized, what support is included, what tools did we have used etc.
Help & Support
Item support includes:
- Availability of the author to feedback
- Get assistance with reported bugs and issues
- Answering questions about the theme
- Help with defects in the item
Item support does not include:
- Theme customizations and installations
- Hosting, server environment, or software
- Support for compatibility with 3rd party plug-ins
- Support for out-dated or modified themes
Note: Support is node via email at websitelayout3@gmail.com
Introduction
We would like to thank you for purchasing Flyweb! We are very pleased you have chosen Flyweb for your website, you will not be disappointed! Before you get started, please be sure to always check out these documentation files. We outline all kinds of good information, and provide you with all the details you need to use Flyweb. Flyweb can only be used with WordPress and we assume that you already have WordPress installed and ready to go. If you do not, please download and install from the WordPress Official Website to help you get started also you can refer for more details How to Install WordPress and First Steps With WordPress.

Theme Requirements
Before beginning the installation and configuring of your new theme, you must first have WordPress with latest version already installed on a server. Your hosting must be running WordPress 4.9 or above, PHP version 7.0 or above, and MySQL 5.6 or above and make sure that server must have full permission and sufficient memory.
To increase the PHP limits and memory. You can do this on your own using cpanel, or contact your hosting provider to increase those limits to a minimum as follows:
- max_execution_time (600)
- max_input_time (600)
- memory_limit (256M)
- post_max_size (128M)
- upload_max_filesize (128M)
- max_input_vars (3000)
For more info: Refer Official Website and please check the video for how to update configuration https://www.youtube.com/watch?v=Zm6etG9Bhh8
What's Included
When you purchase our theme from Themeforest, you need to download the Flyweb files from your Themeforest account. Navigate to your downloads tab on Themeforest and find Flyweb. Click the download button to see the two options. The Main Files contain everything, the Installable WordPress Theme is just the installable WordPress theme file. Below is a full list of everything that is included when you download the main files, along with a brief description of each item.
Flyweb Theme Folder – contains the flyweb.zip and flyweb-child-theme.zip wordpress theme. The child theme is only for users who make code changes.
Installation
Theme Installation
In order to install the theme you need to have a WordPress copy already installed on your own server. (Fore more details: How to Install WordPress and First Steps With WordPress)
- After Downloading this package you have to extract first and then need to install the theme
- Log in to your WordPress Dashboard
- Go to Appearance > Themes then click to Add New
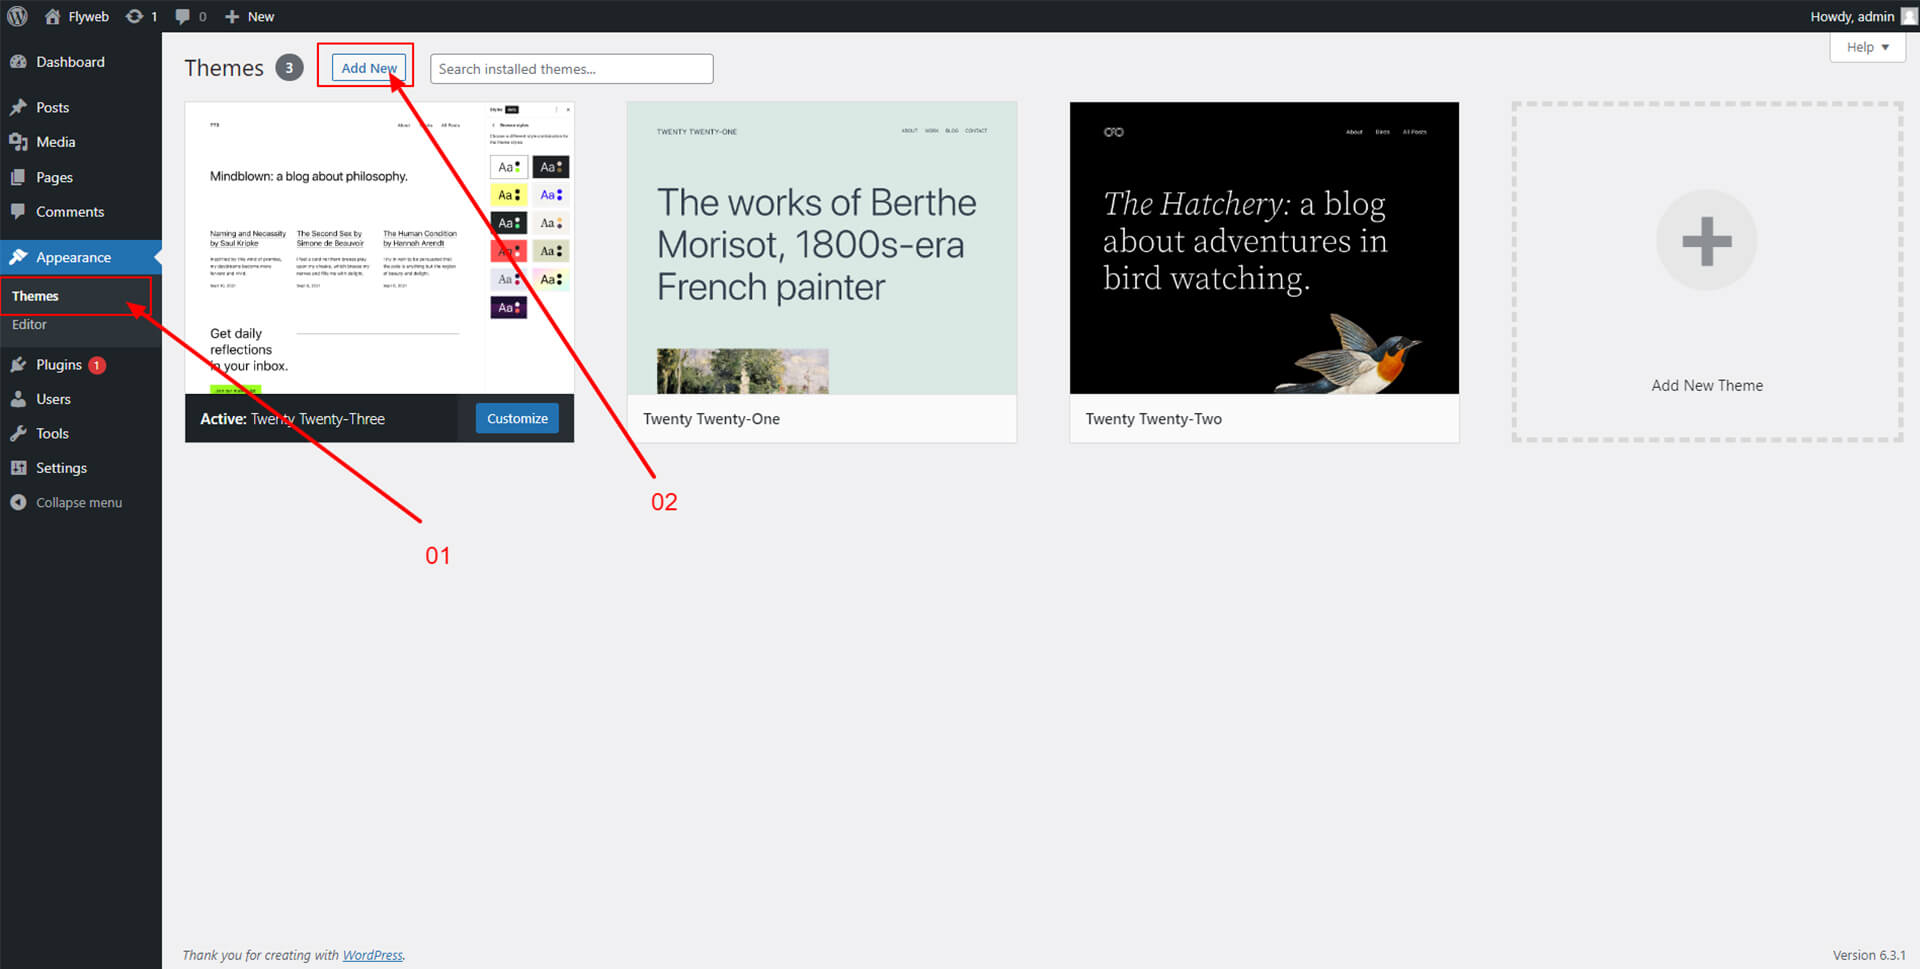
- Click on
Upload Theme .
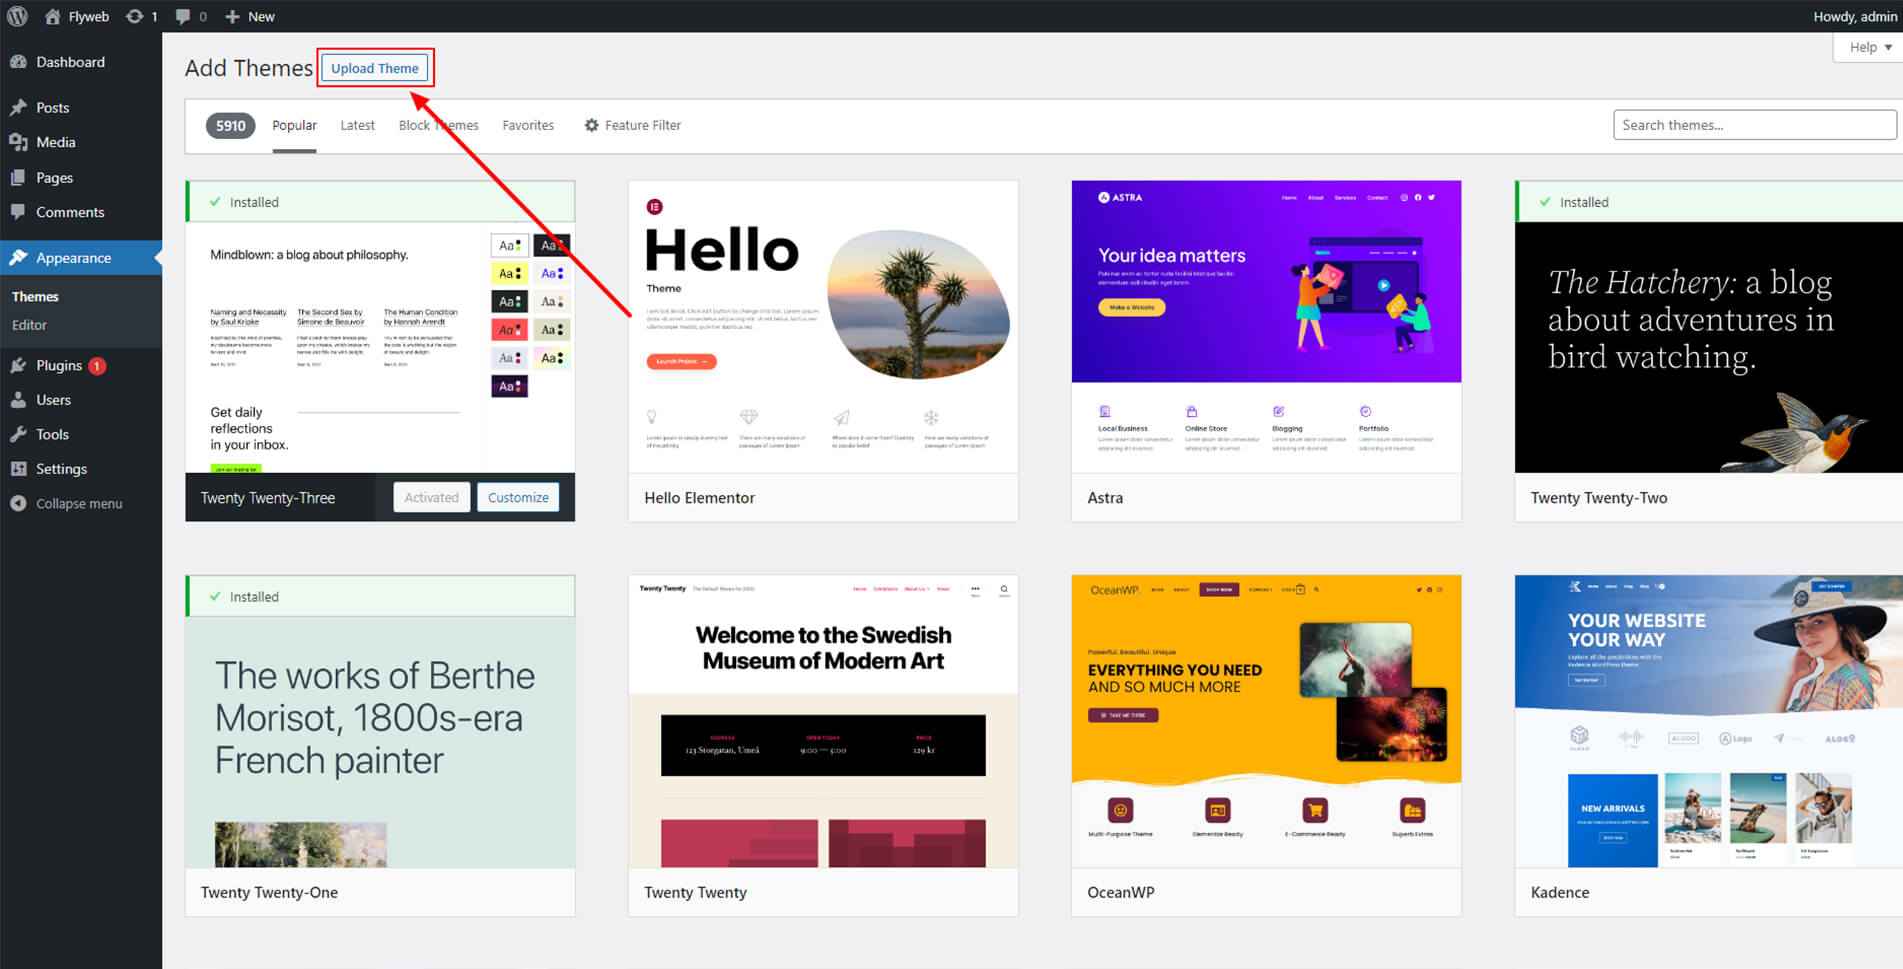
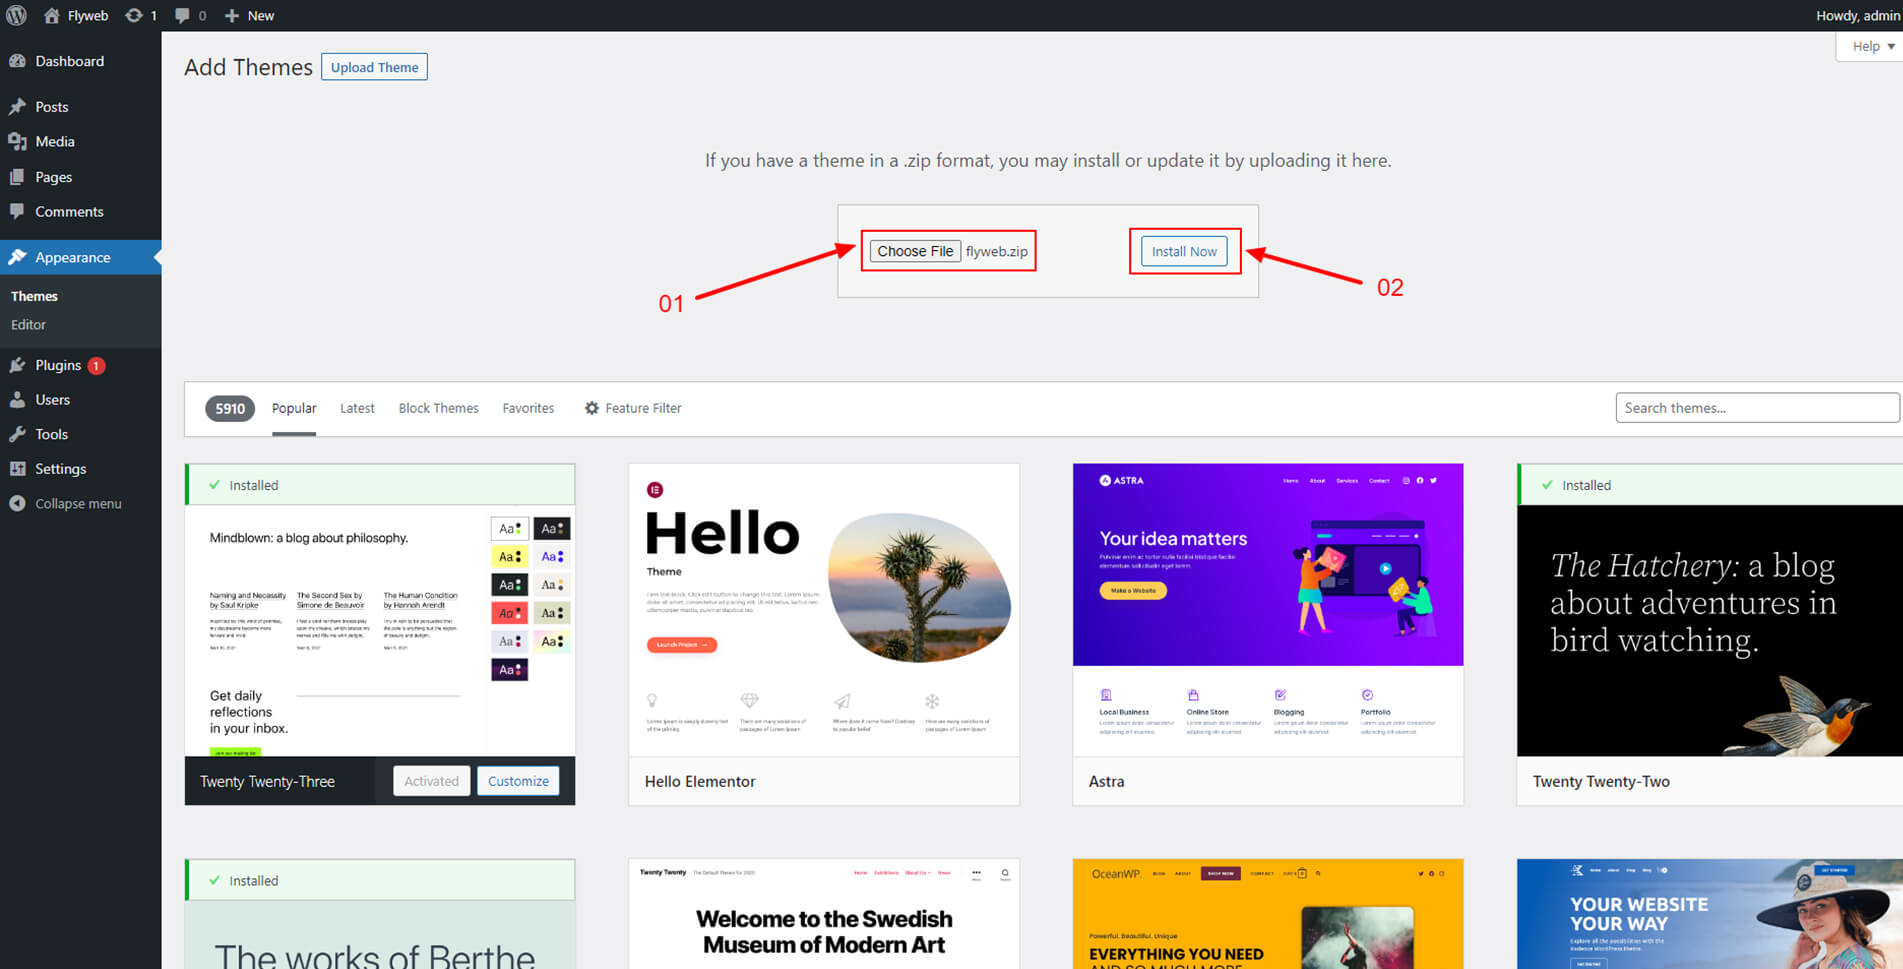
- Upload your downloaded flyweb.zip file and then click on Install Now
- When the installation complete, click Activate to activate your theme.
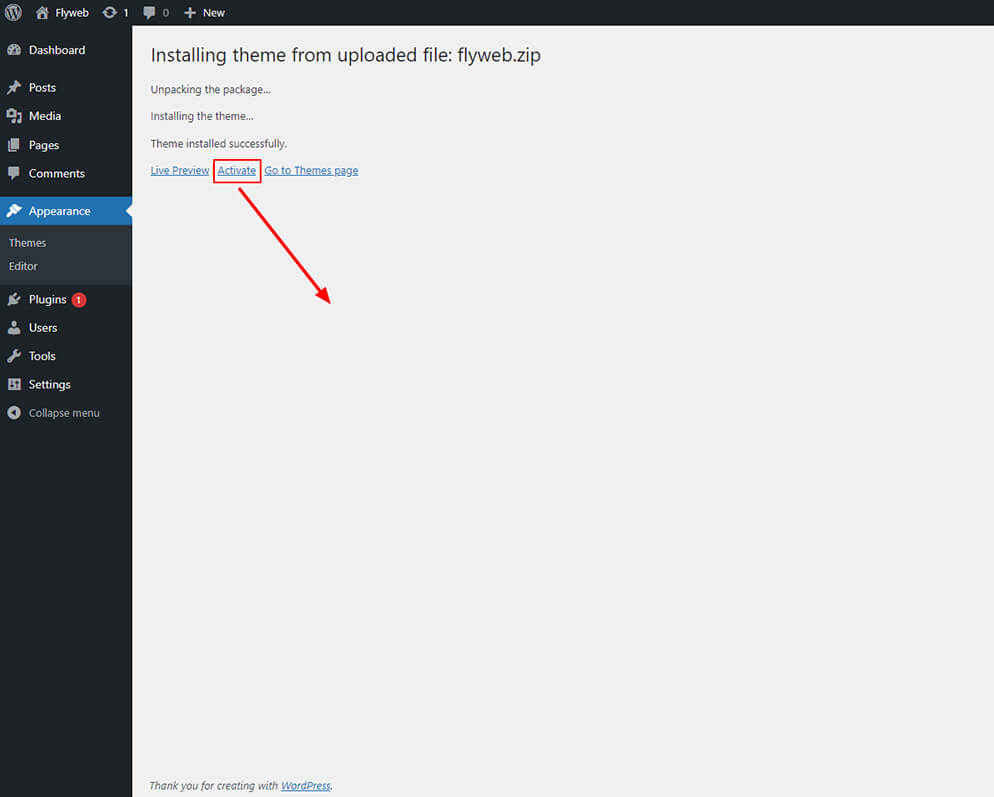
- Done.
Install theme via FTP
Step 1 – Log into your hosting space via an FTP software
Step 2 – Unzip the flyweb.zip file and ONLY use the extracted Flyweb theme folder
Step 3 – Upload the extracted More theme folder into wp-content > themes folder
Step 4 – Activate the newly installed theme. Go to Appearance > Themes and activate it.
Step 6 – Then you will get a notification to activate the required plugins: Redux Framework and Contact Form 7 and Other Plugins. Follow the steps to instal and activate. The other plugins we include are integrated into the theme and all will be ready to use when you right away.
Plugin Installation
After the theme is installed a message box will appear requesting you to install required plugins
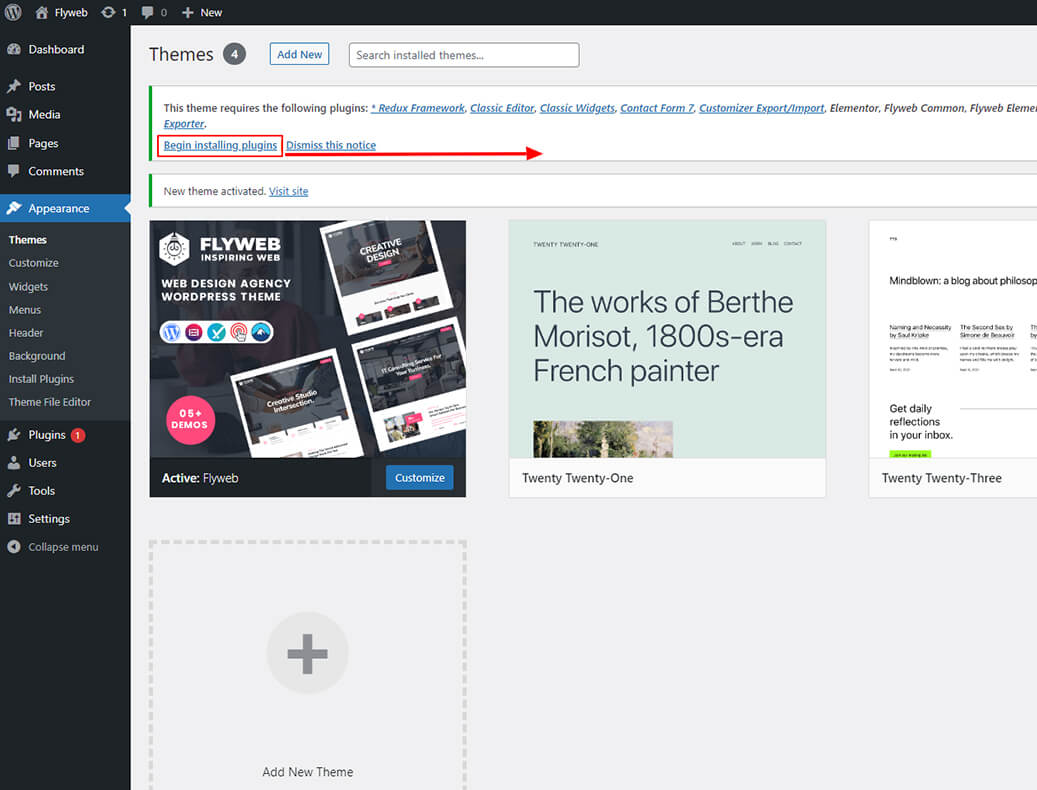
Click Begin installing plugins. You will be navigated to Install Required Plugins page.
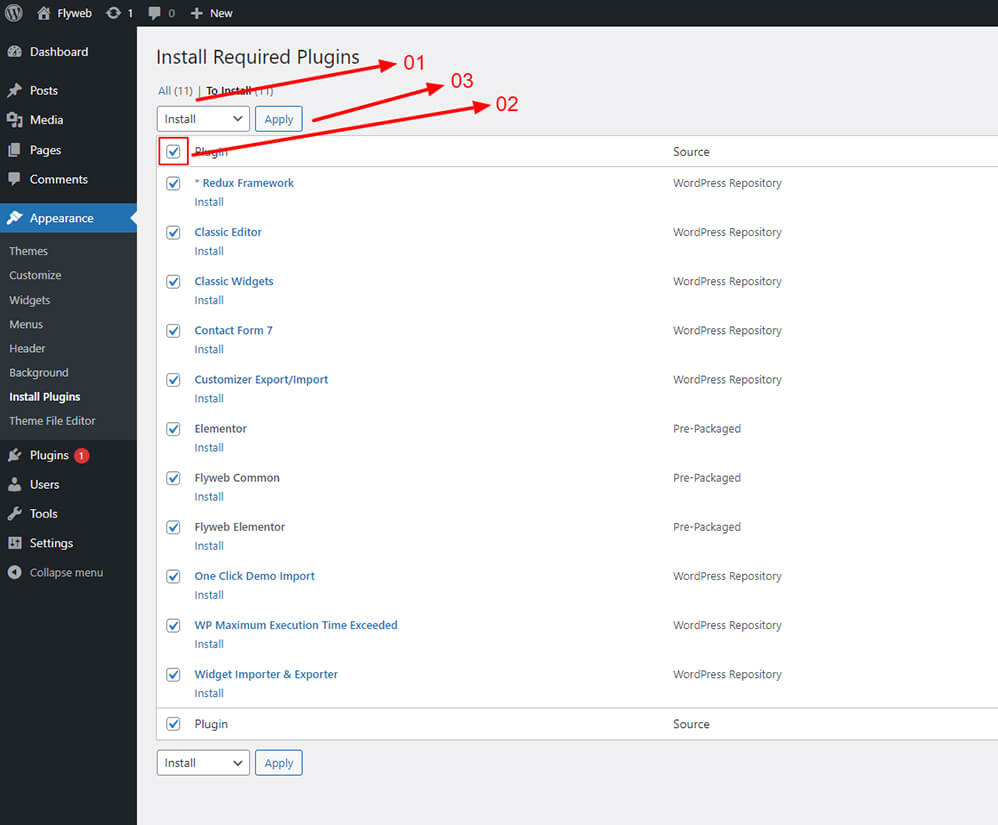
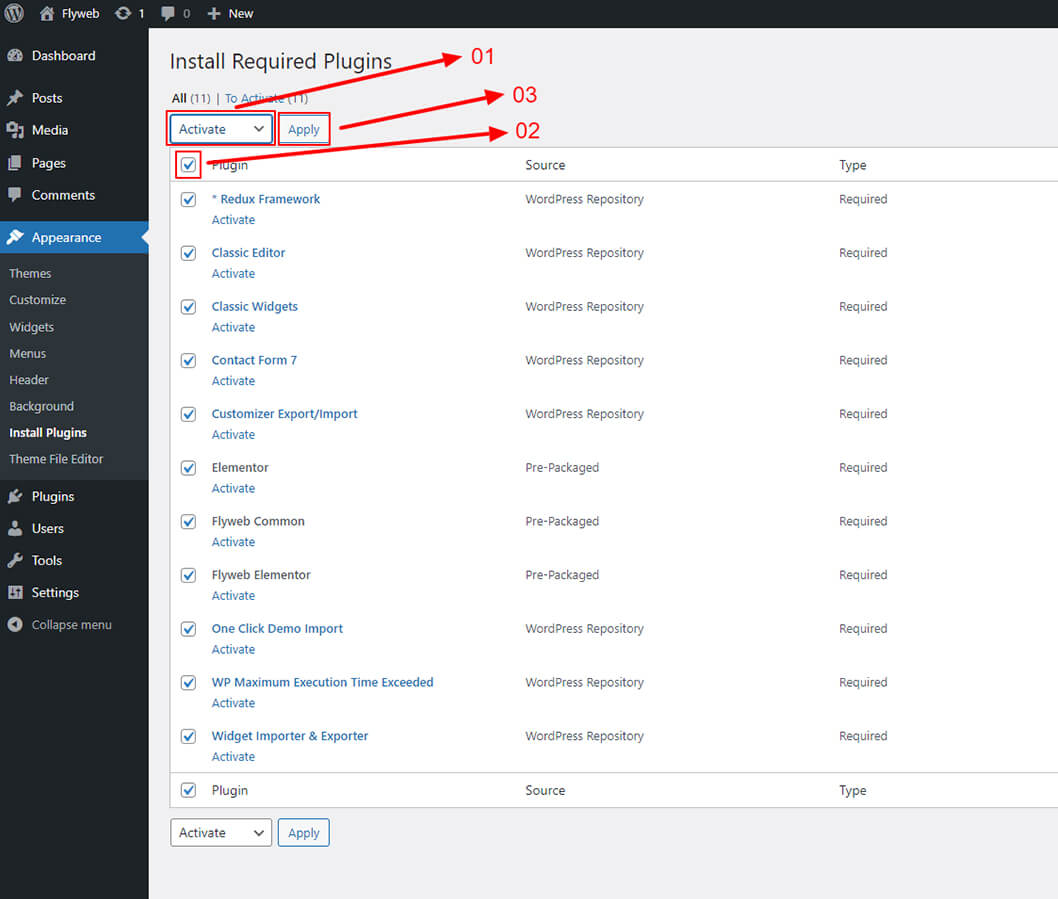
Next, check boxes to select all the plugins, select the bulk action of install from the dropdown box and then click the Apply button.
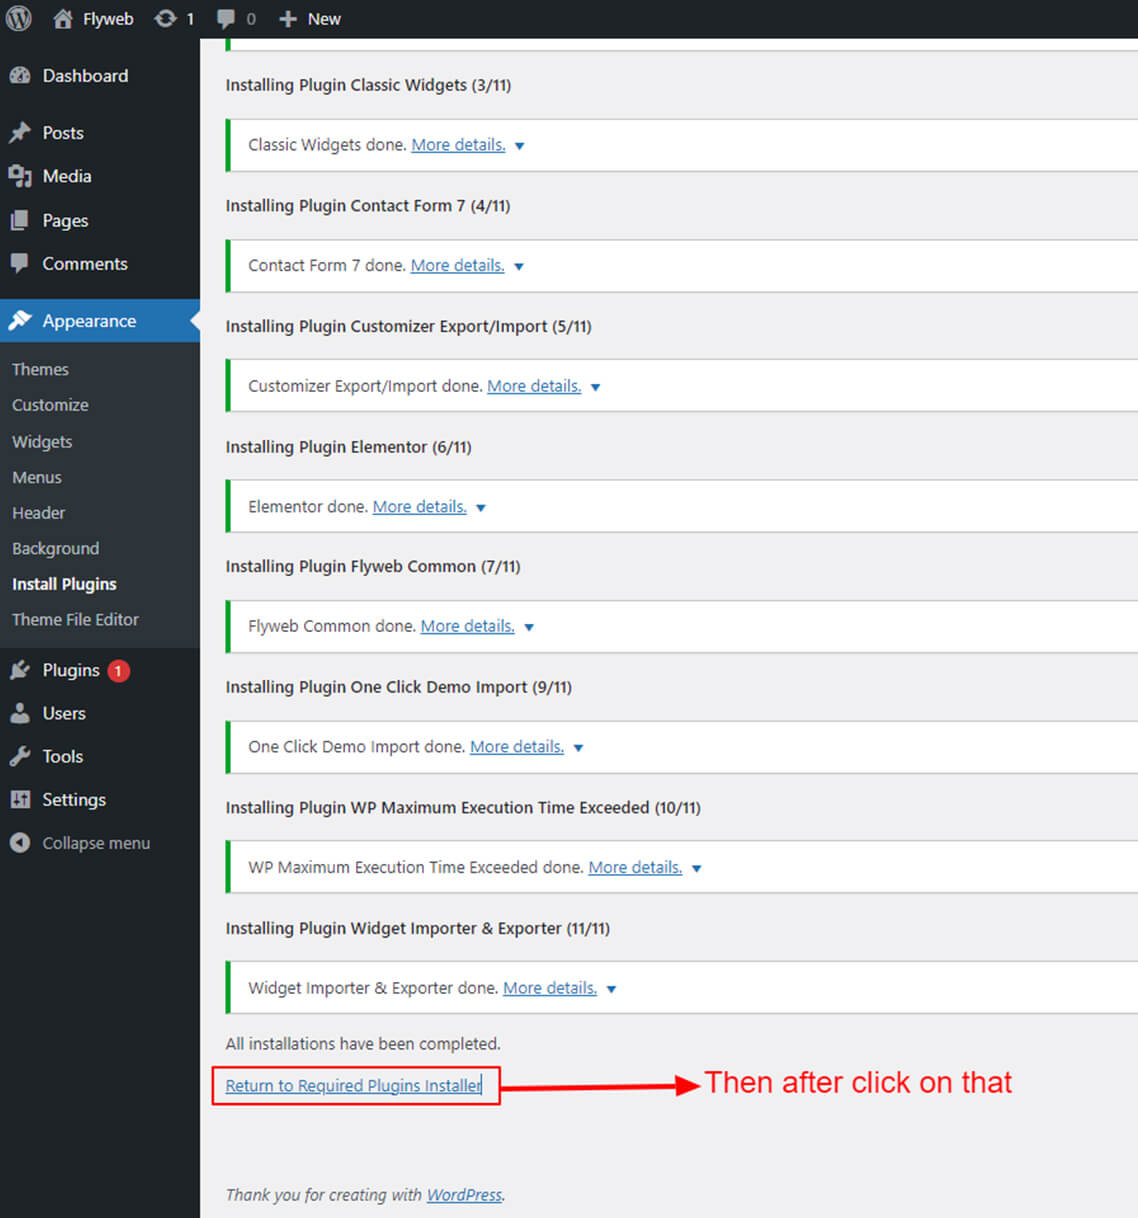
When finishing, you will got a confirmation notice that your plugins are activated.
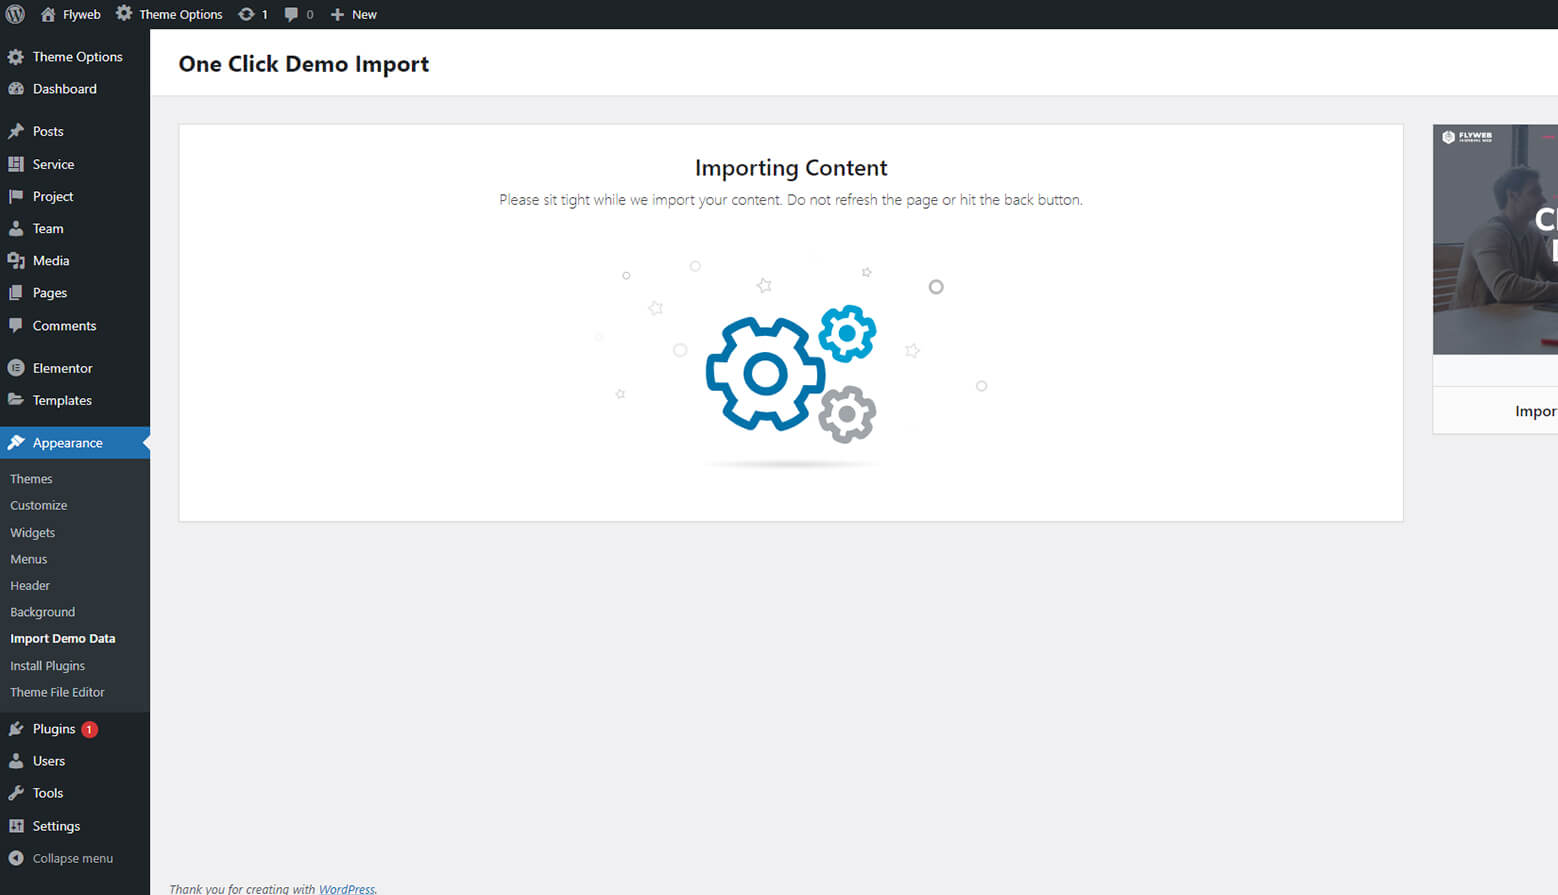
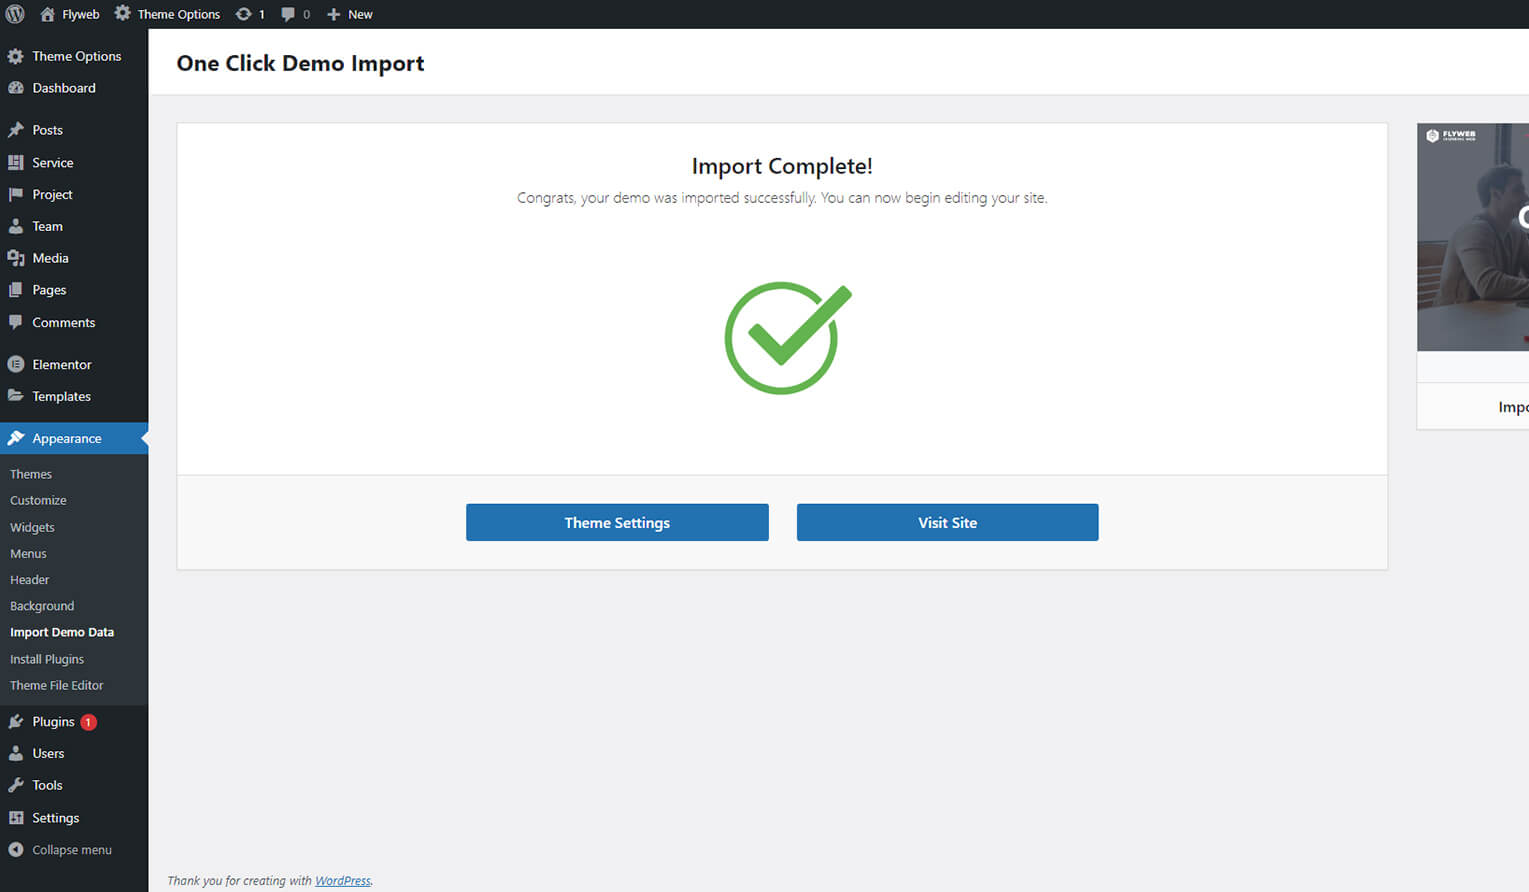
Demo Installation
Your Flyweb installation will be ready with data on our demo site, and you can use it as a template to develop your own website.
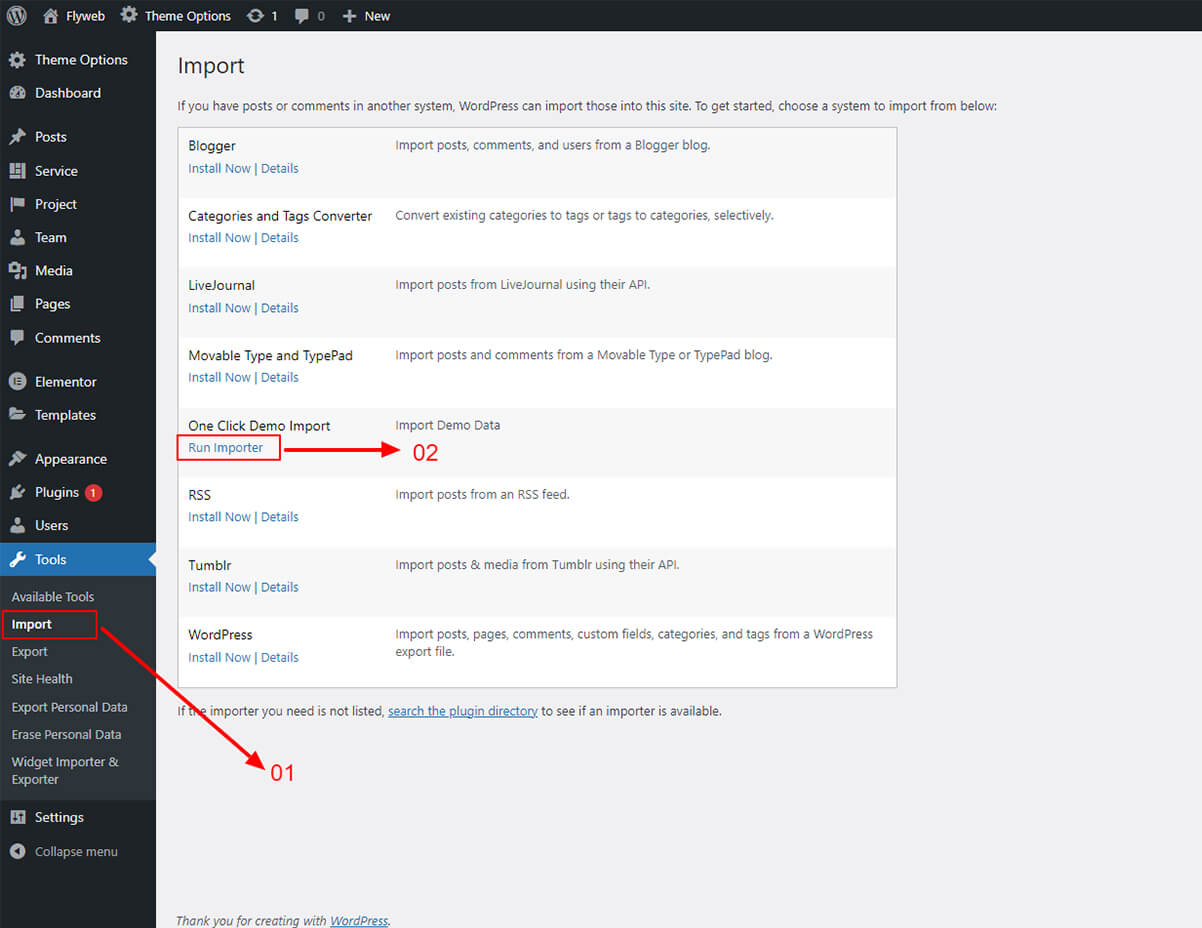
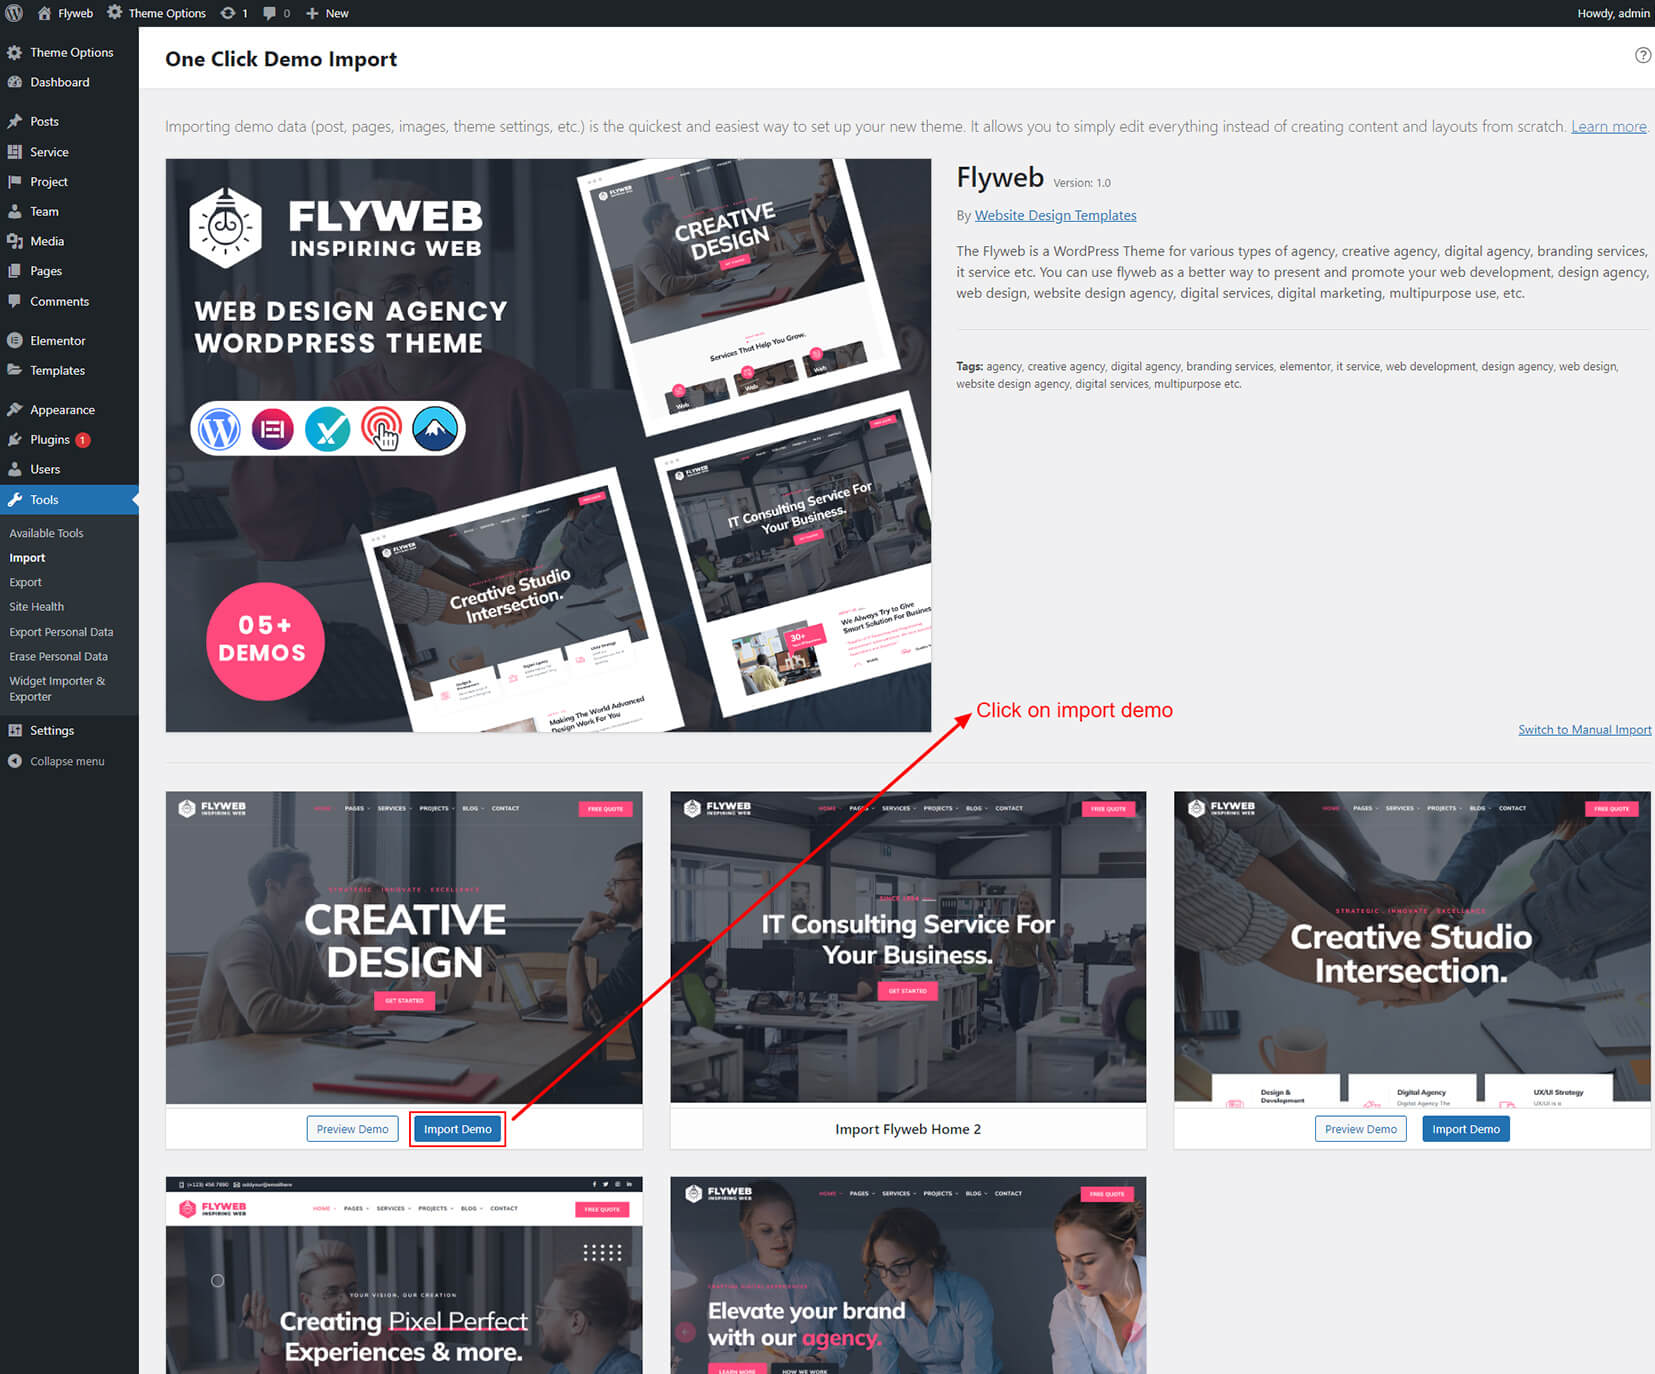
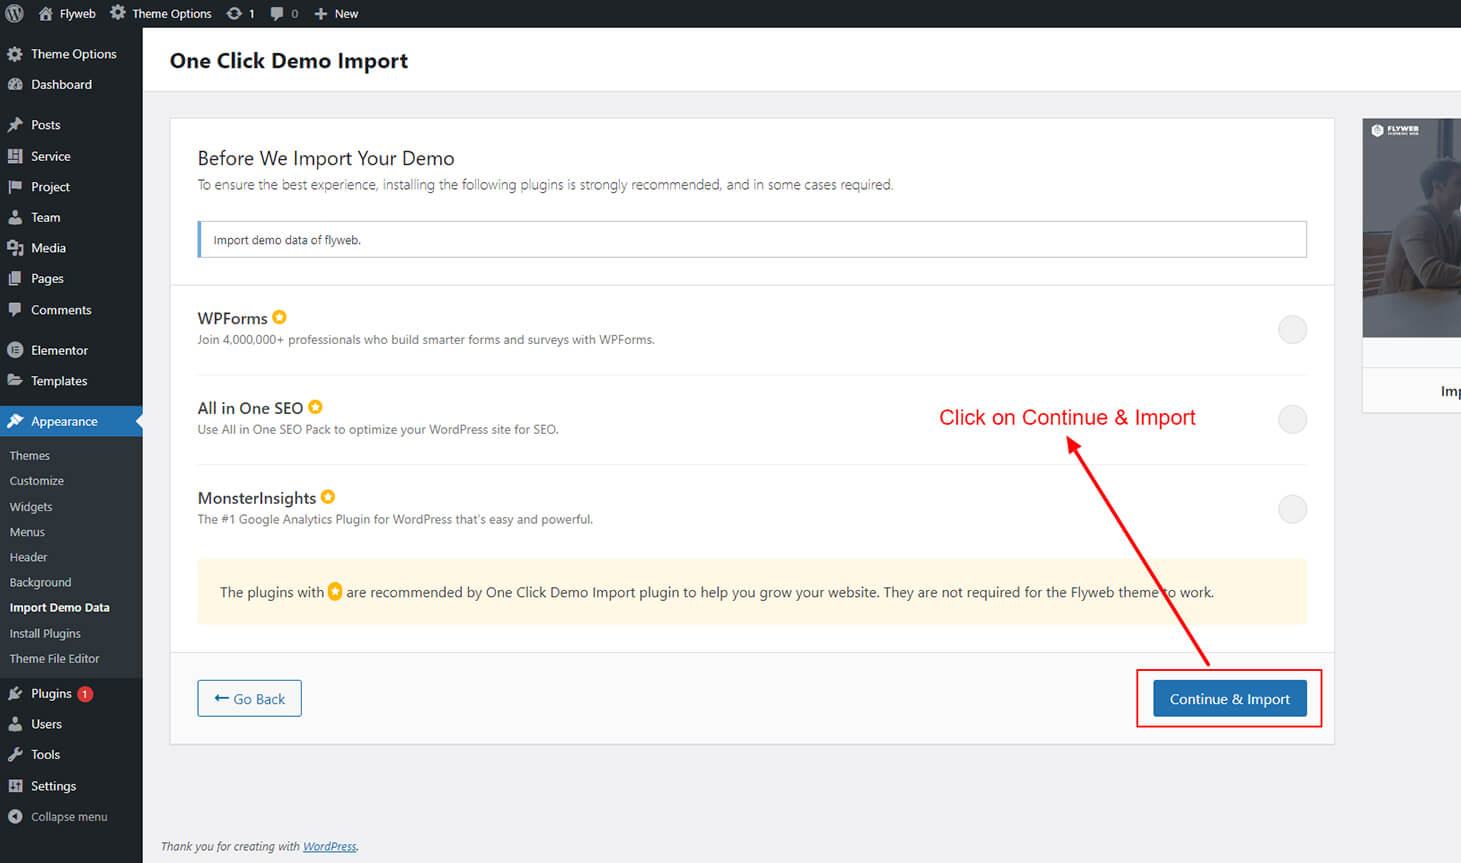
Have a cup of coffee. The process is within minutes.
When finishing, it should look like this:
Elementor Settings - It is Important - Please don't miss it!
Settings Update
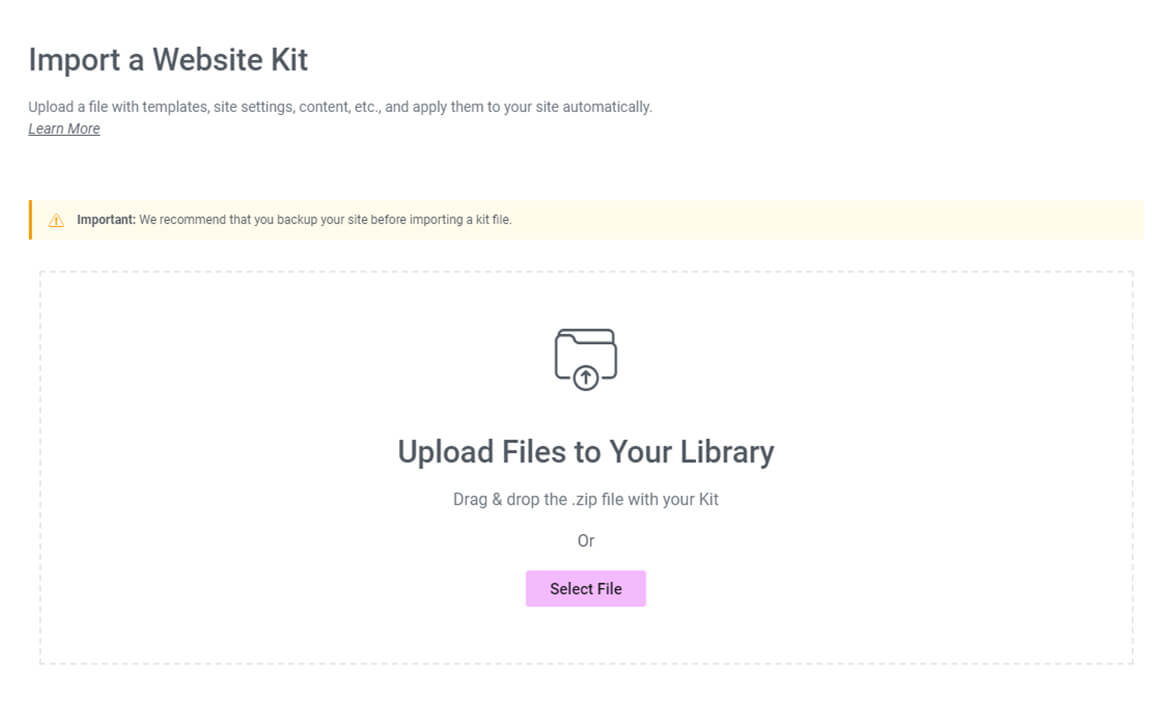
- Now Import the Elementor Settings from Import Kit (Importing this kit will add extra responsive devices to Elementor): Path of kit zip file - flyweb_package\data_export\elementor-kit.zip
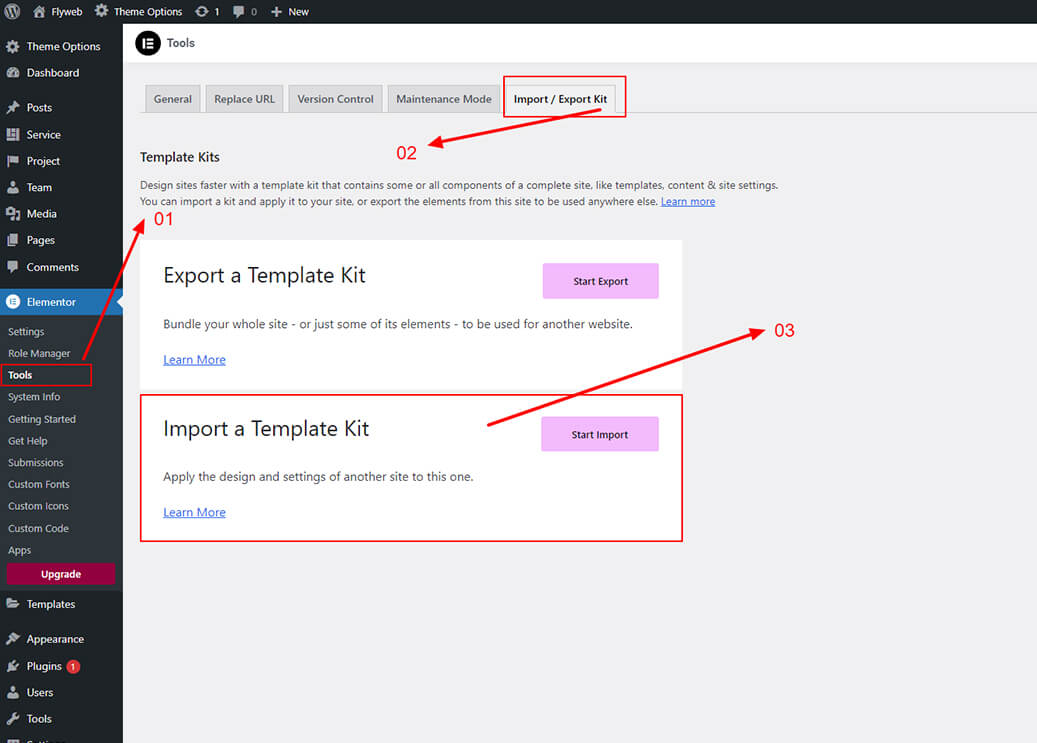
- Click Now Import the Elementor Settings Import Kit, Drag and drop elementor-kit.zip file here or add it with Select file button and click on next button right-bottom corner button.(flyweb_package\data_export\elementor-kit.zip)
- Click on Next Button.
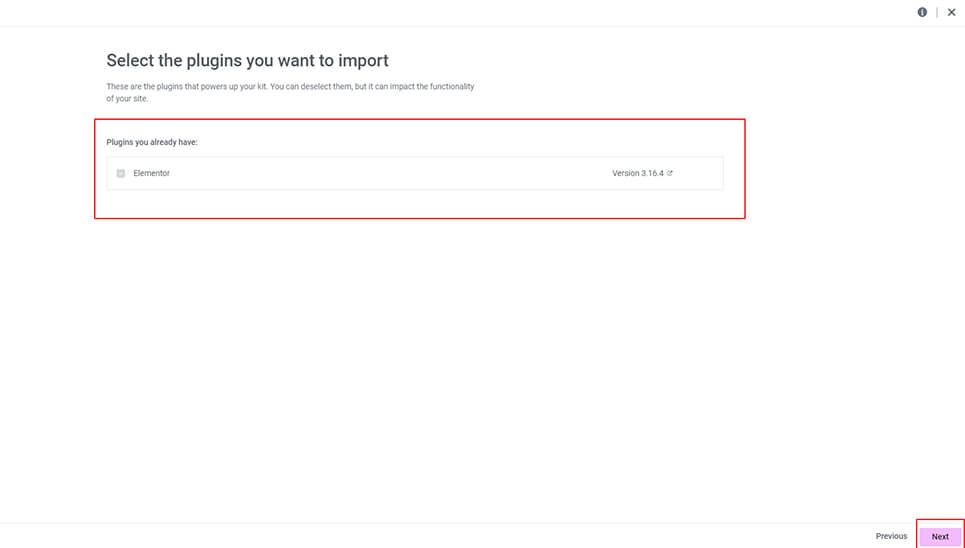
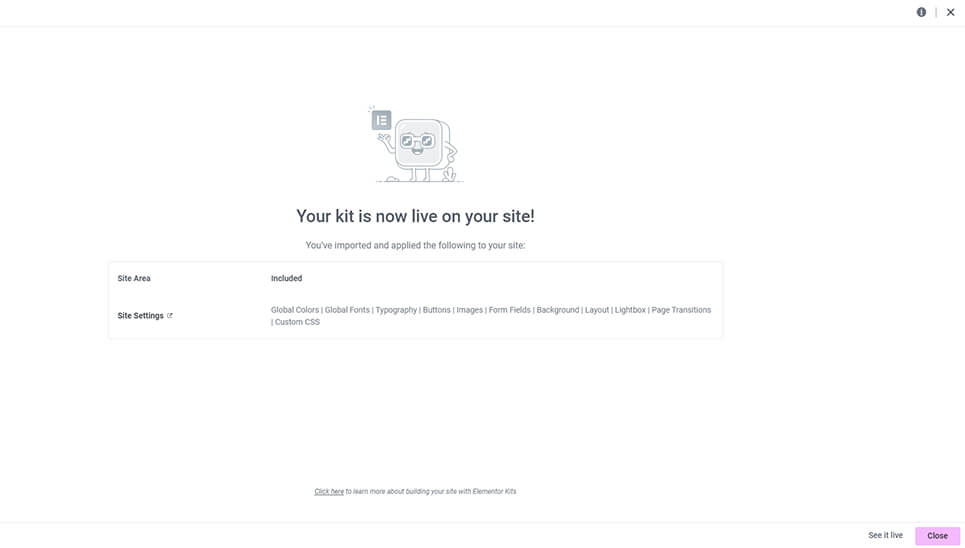
- Click on Next Button and Import the Site Settings.
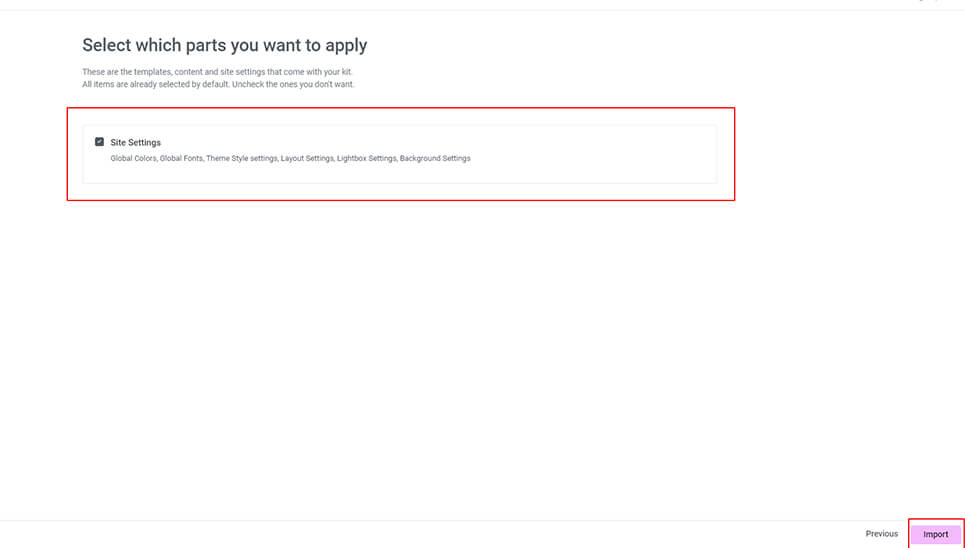
- Done it! and close the elementor settings now.
Theme Options (Flyweb) - It is Important - Please don't miss it!
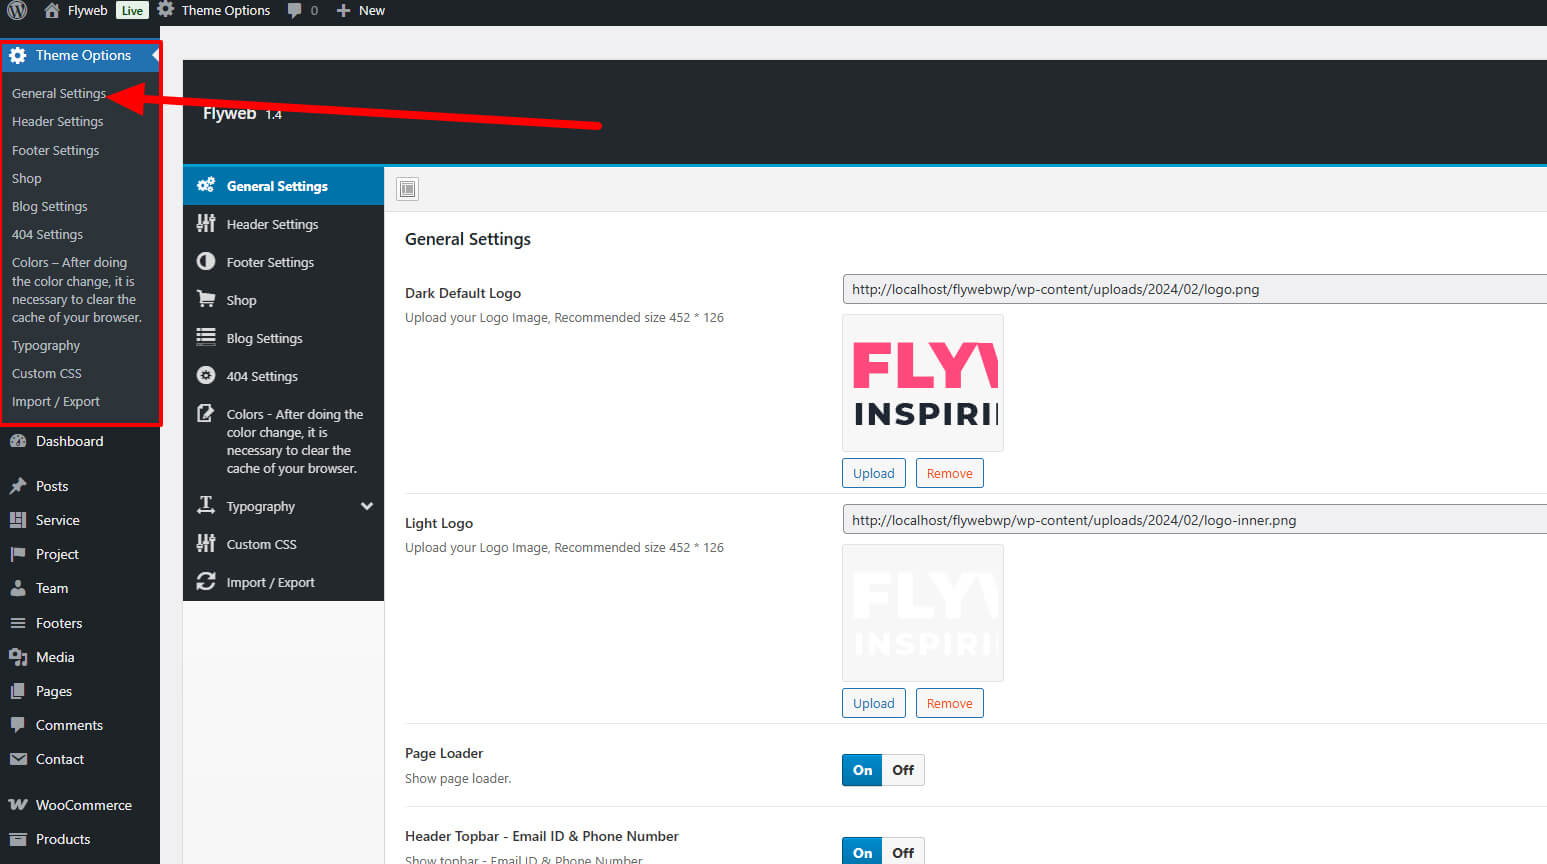
General Settings
Go to Theme Options > General Settings and make your settings then click Save Changes. You can update your logo in this section.
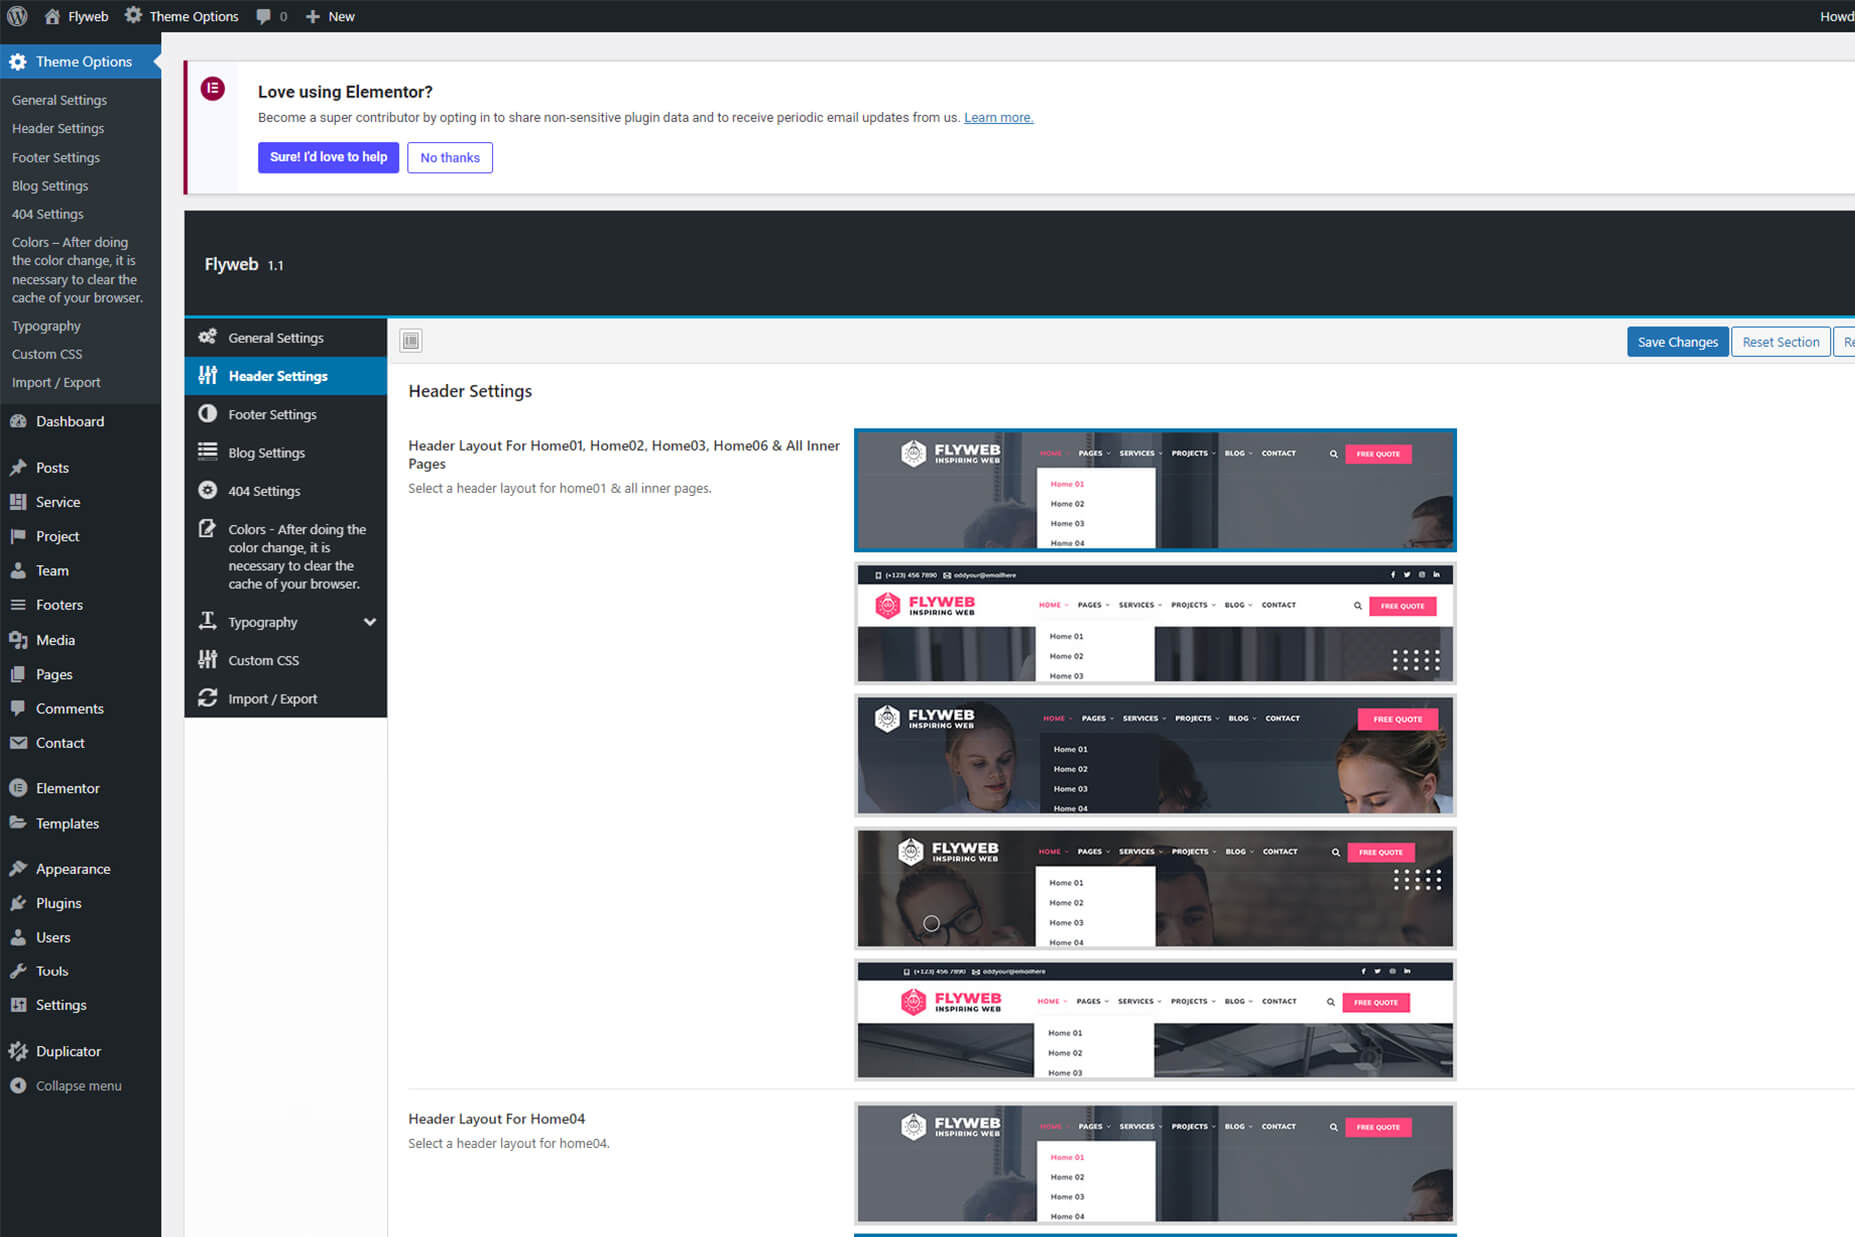
Header Settings
Go to Flyweb Options > Header Settings and make your settings then click Save Changes.
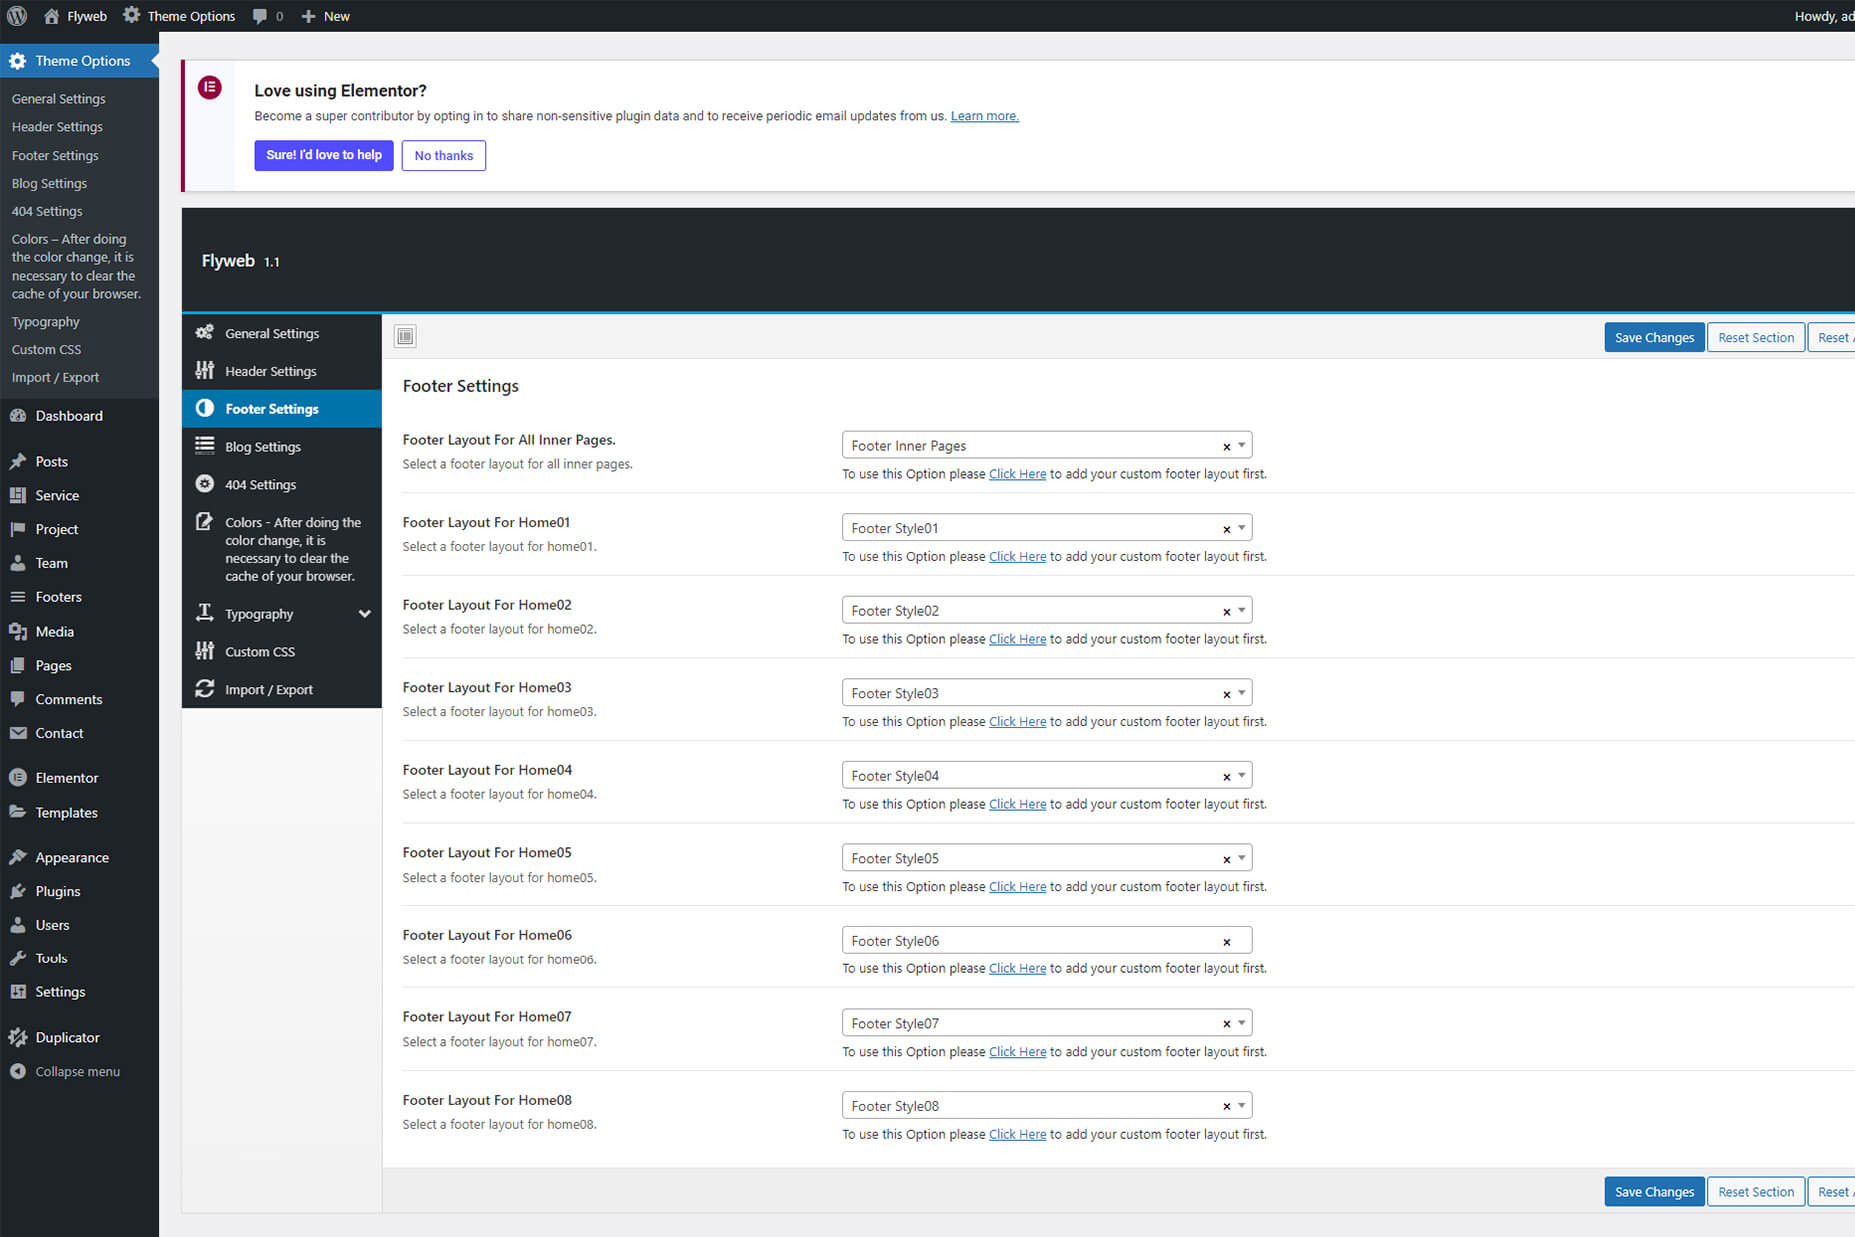
Footer Settings
Go to Flyweb Options > Footer Settings and make your settings then click Save Changes.
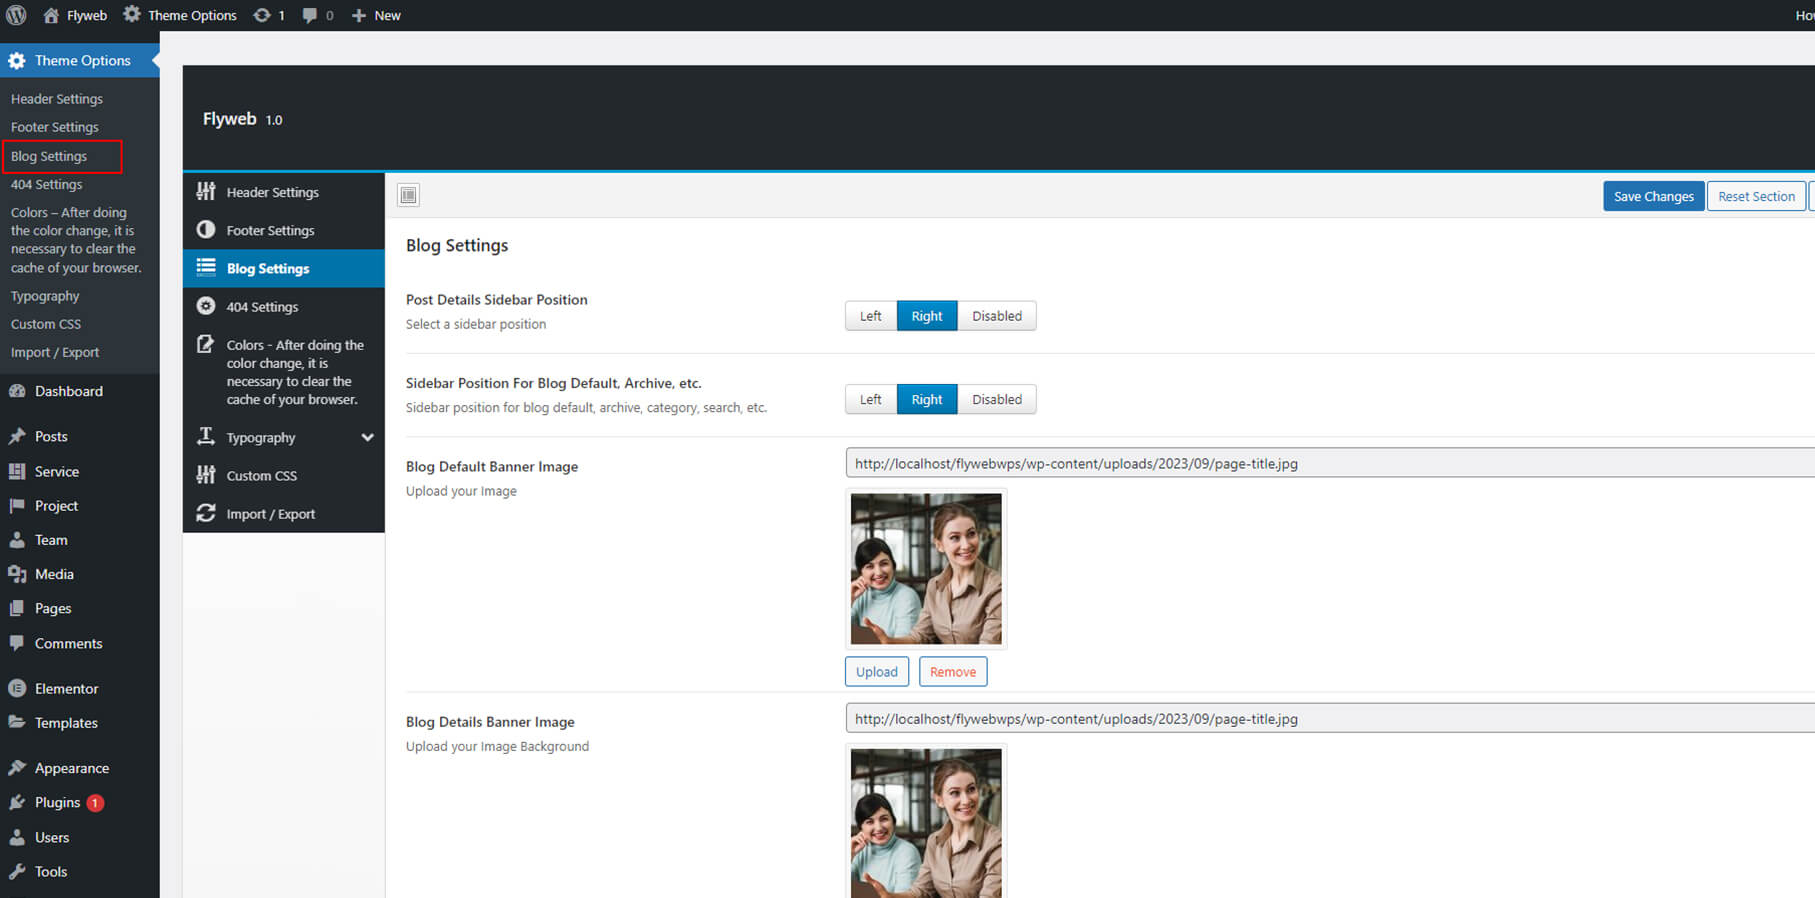
Blog Settings
Go to Flyweb Options > Blog Settings and make your settings then click Save Changes.
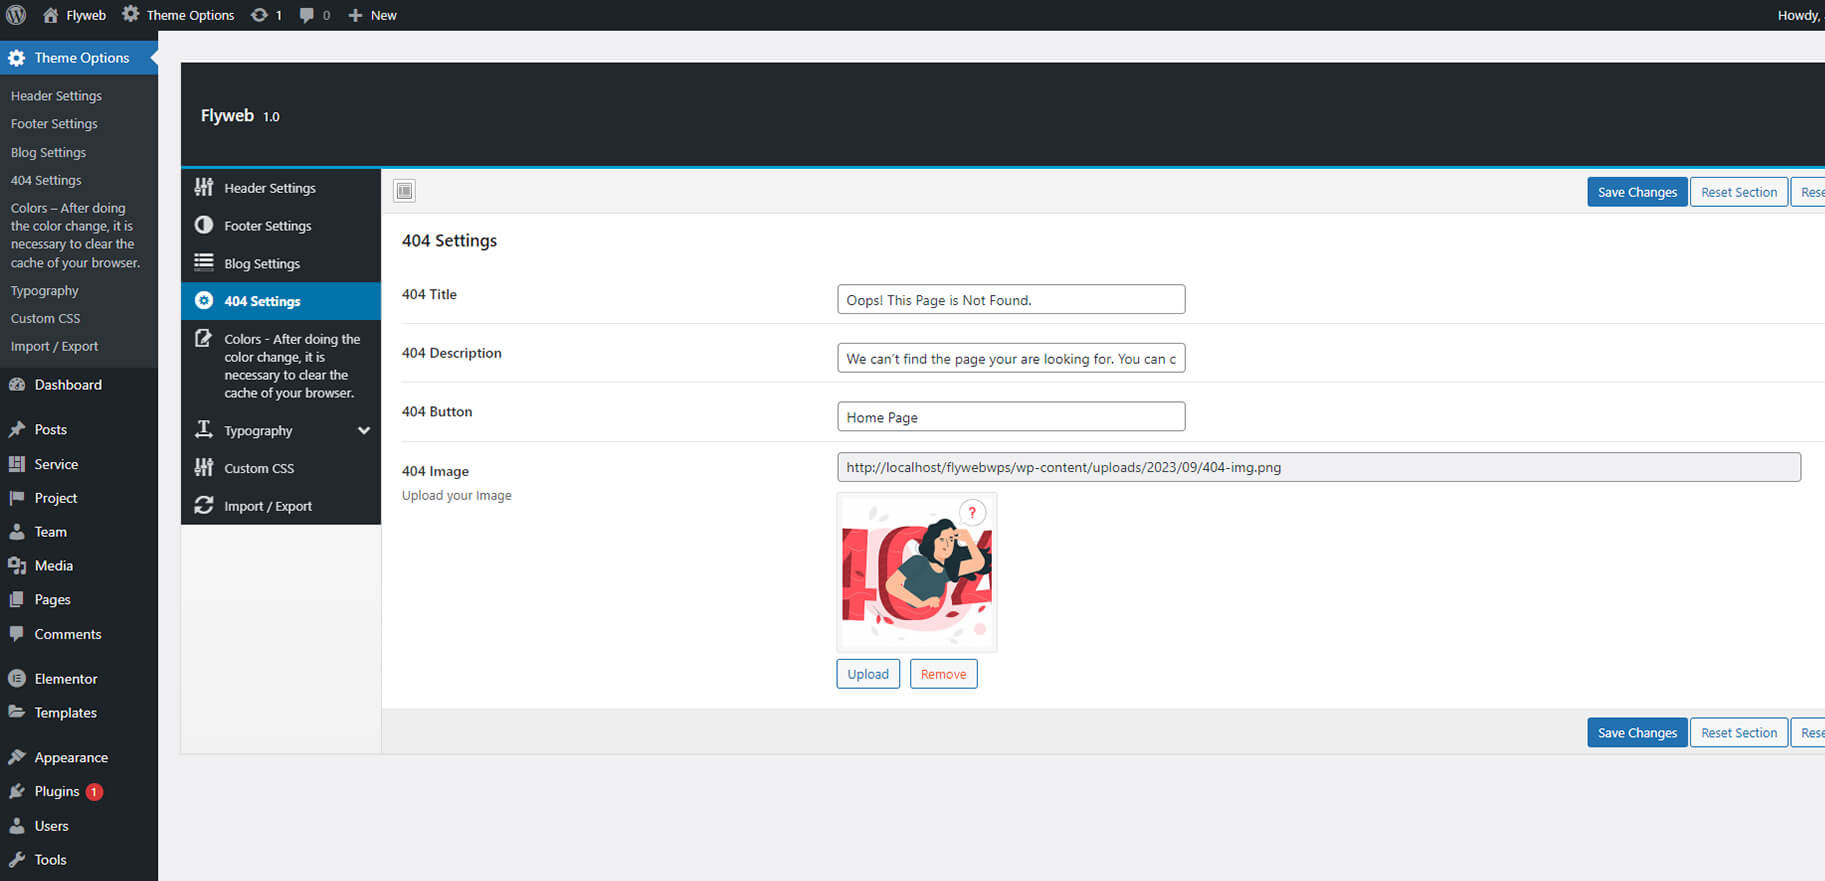
404 Settings
Go to Flyweb Options > 404 Settings and make your settings then click Save Changes.
Shop & WooCommerce Integration
Setting Up Your Shop (Optional)
- Flyweb is compatible with WooCommerce, allowing you to create a powerful online store. We do not bundle WooCommerce by default because many customers don't require e-commerce, and this keeps your website lean and fast, allowing you to install it only if needed.
- Install WooCommerce: Go to Plugins > Add New, search for "WooCommerce," then "Install" and "Activate."
- Run Setup Wizard: Follow the WooCommerce setup wizard to configure basic store settings.
- If you wish to add images like the demo, you can import the wc-product-export-20-6-2025-1750427402040.csv from the path: `flyweb_package\data_export`.
- To import a CSV file (for example, WooCommerce products), go to WooCommerce > Products, click 'Import', then upload your CSV (Above point), map the columns, and run the importer.
- Add Products Manually: Navigate to Products > Add New to start adding your security items.
- Manage your **Shop sidebar** content by dragging and dropping widgets in Appearance > Widgets > Shop Sidebar.
- You can manage your Shop page settings from Admin / Theme Options / Shop.
- Flyweb will automatically style your shop pages beautifully.
Site Configuration
Navigation & Menus
-
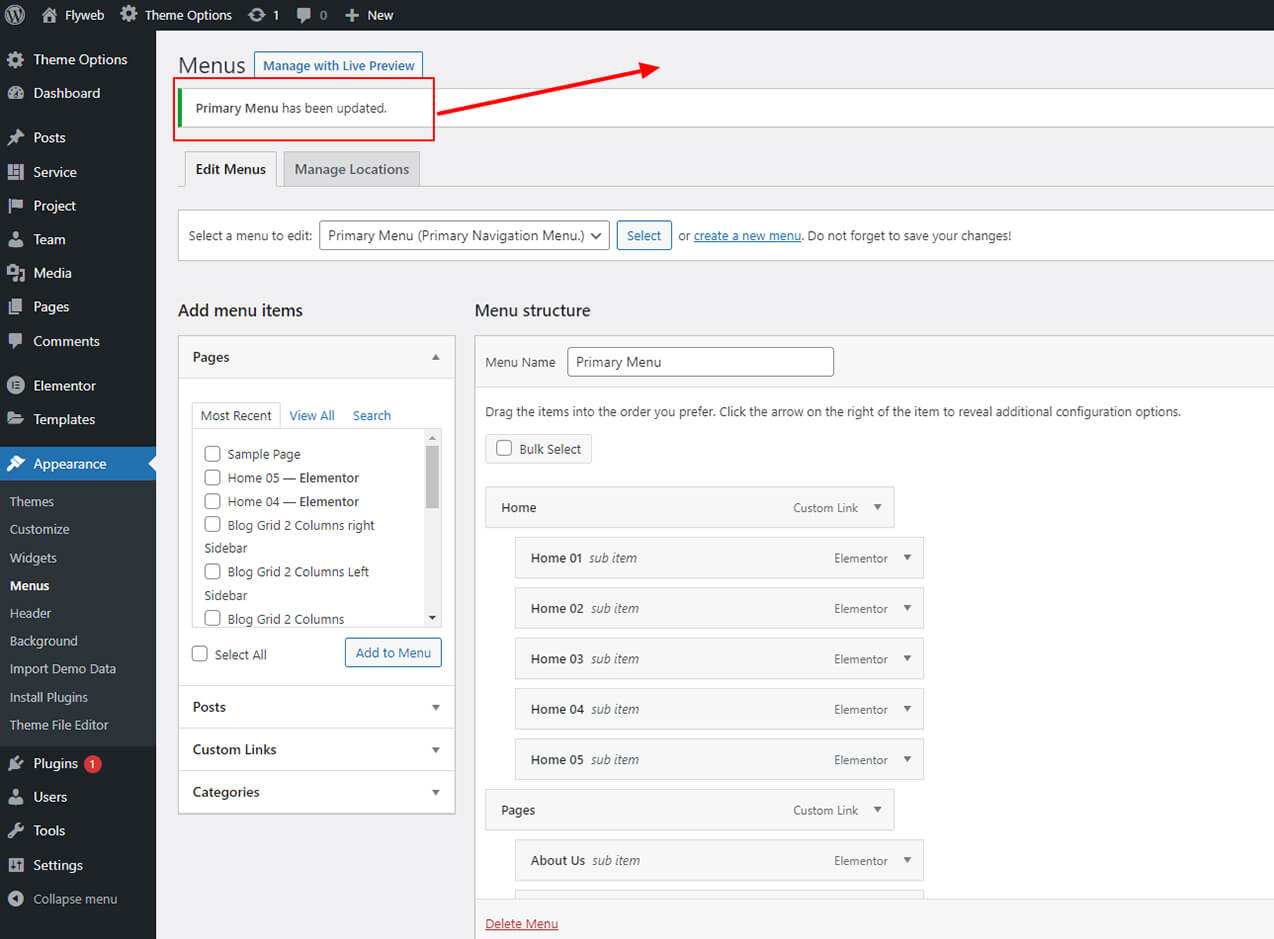
Go to Appearance → Menus in your admin sidebar and click Primary Navigation Menu option. Then click Save Menu.
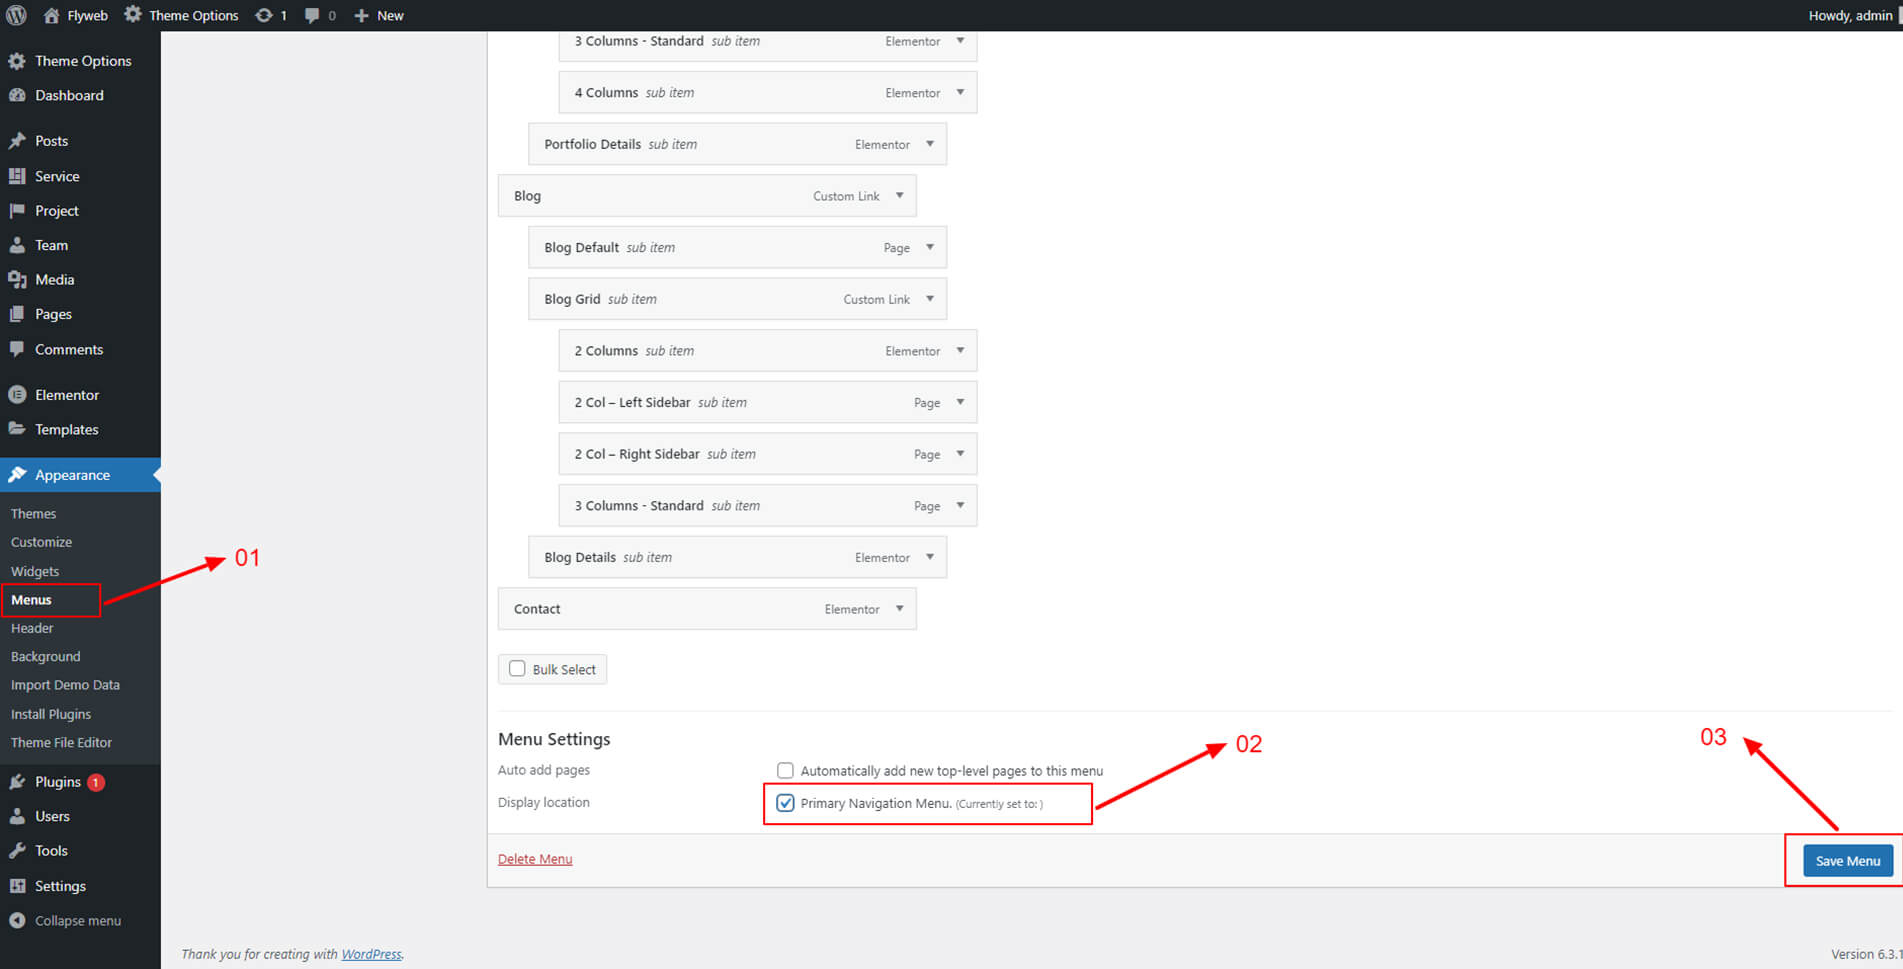
- When finishing, it should look like this:
Site Settings
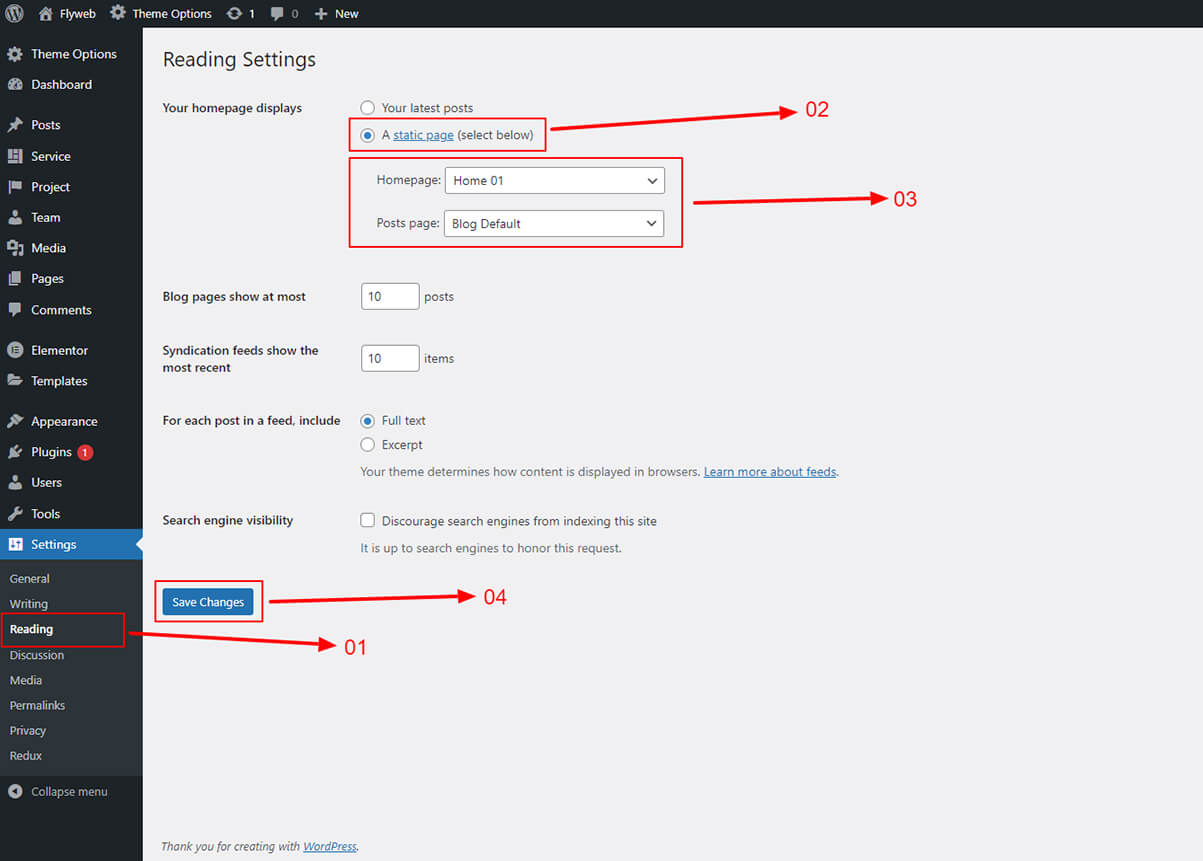
Setting Up Front Page
Go to Setting > Reading and choose the page you like to be your front page then click Save changes.
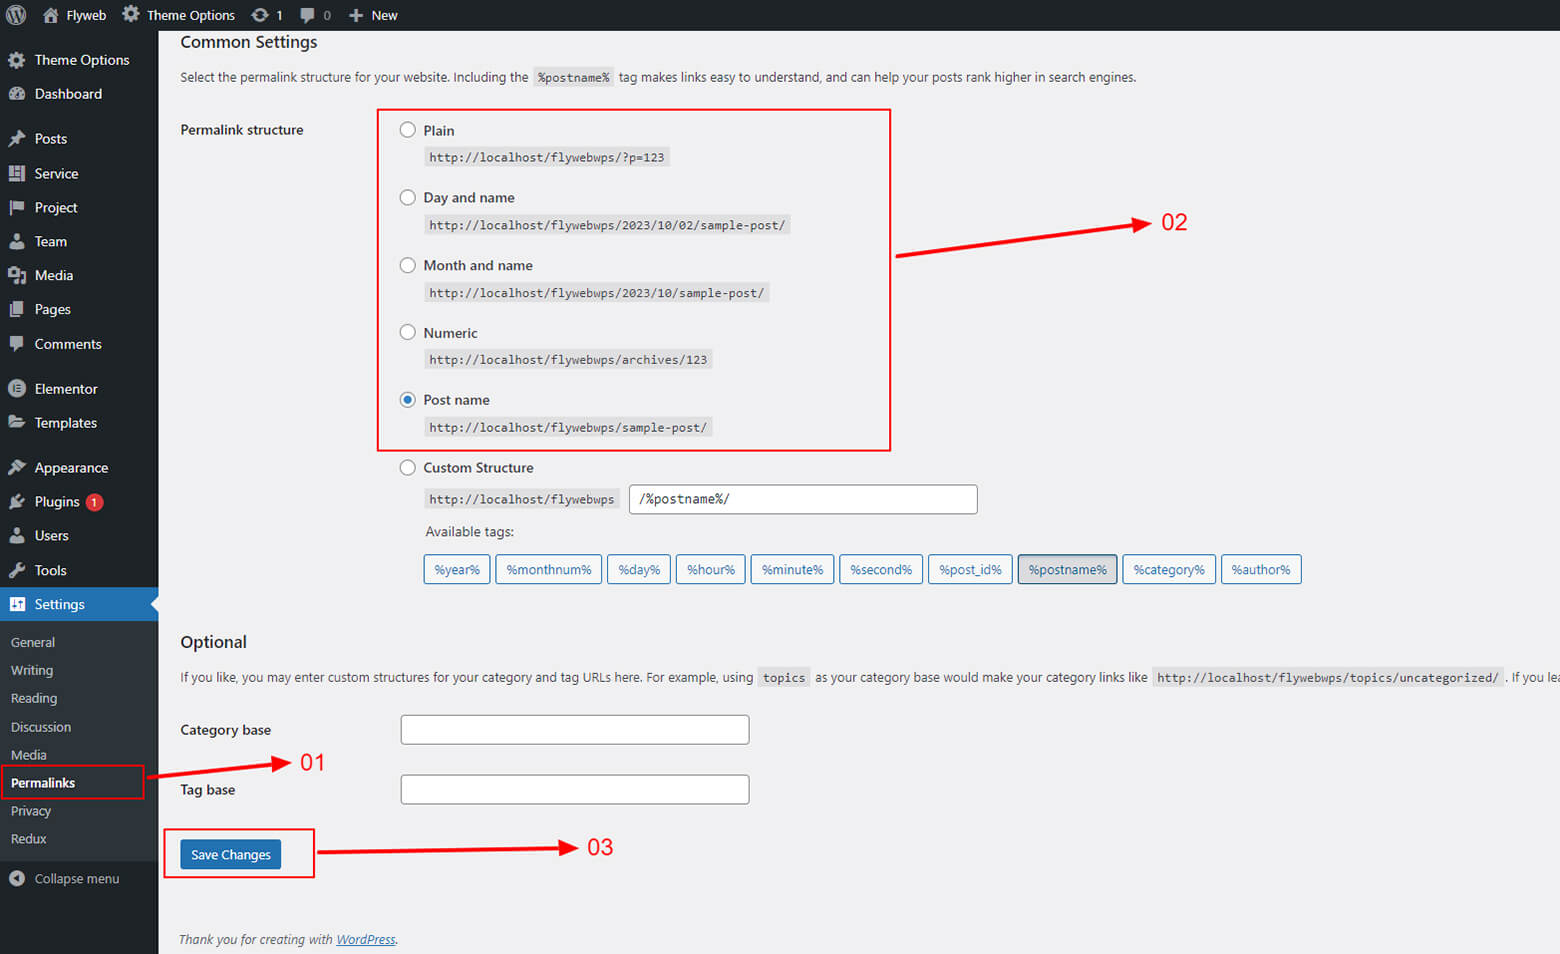
Setting Up Permalinks
Go to Setting > Permalinks and select one from common settings then click Save changes.
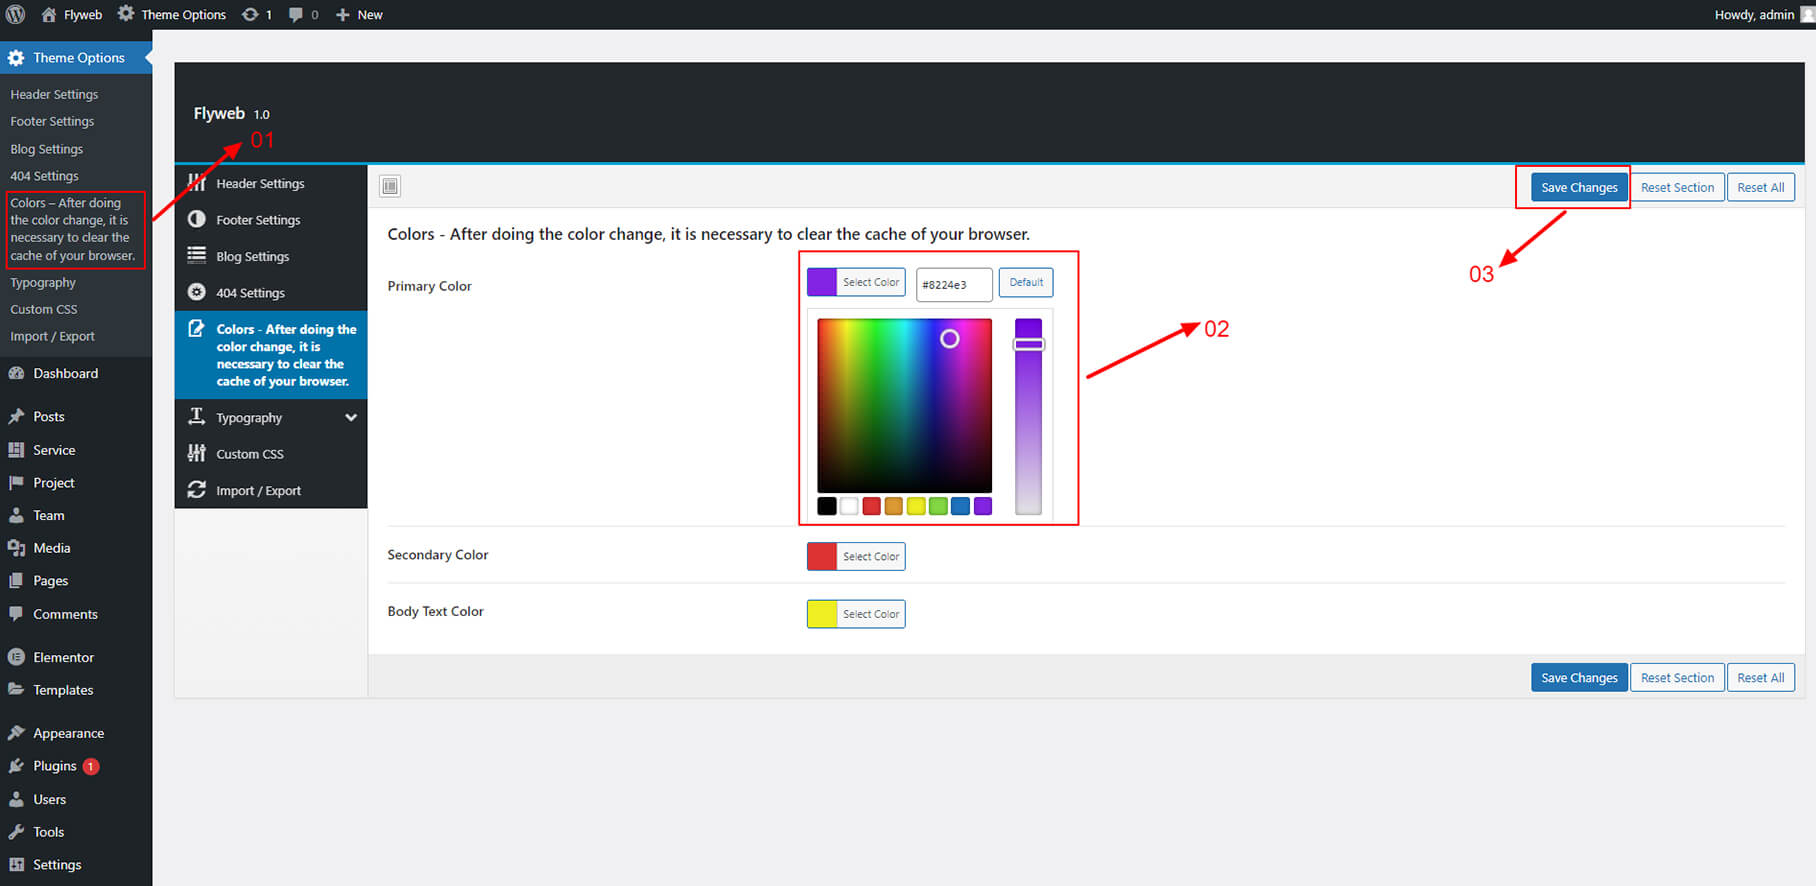
Change Theme Colors
You can easily chage the theme color from the admin side. Go to Theme Options > Colors. Set your Primary Color, Secondary Color and Dark Color. After change the color if you want to reset color then click on Reset Section button to the right corner and Save Changes.
Note: Make sure, When you change the color from the Admin side, styles.css (flyweb/css/styles.css) will be generated and overwrite. If you make any changes in the styles.css (flyweb/css/styles.css) you will lose your hard work changes!
Note: Scroll to top button in the right-hand corner, in which the percentage appears, to change its color, you have to change the color code in the main.js (wp-content\themes\flyweb\js\main.js - line no. 75).
Preview Image After Change the Color

Customization - Simple Way
If you prefer to work with theme as a static source without scss, We recommend that you add your code into this file (flyweb/style.css) so whenever theme update is available and you update the theme, You will not lose your hard work!
Font Awesome Icons
Font Awesome includes more than 600 icons that can be easily used on your site. For example you want the download link with the PDF icon.
-
Go to Font Awesome Icons gallery and find the one you need. I our example it is
file-pdf. Click the detail, then find and copy. -
Place the copied line to your link:
Download File
Themify Icons
Themify Icons includes more than 320+ icons that can be easily used on your site. For example you want the download link with the file icon.
-
Go to Themify Icons gallery and find the one you need. I our example it is
file. Click the detail, then find and copy. -
Place the copied line to your link:
File
Bootstrap Utilities
Theme is using Bootstrap utilities very often. We think that it is better solution as writing all styles for every element into CSS file. It makes the style.css smaller and it is more flexible. You can find more about Bootstrap Utilities.
Page
How to Create a New Page
For Make new page you can check below image:
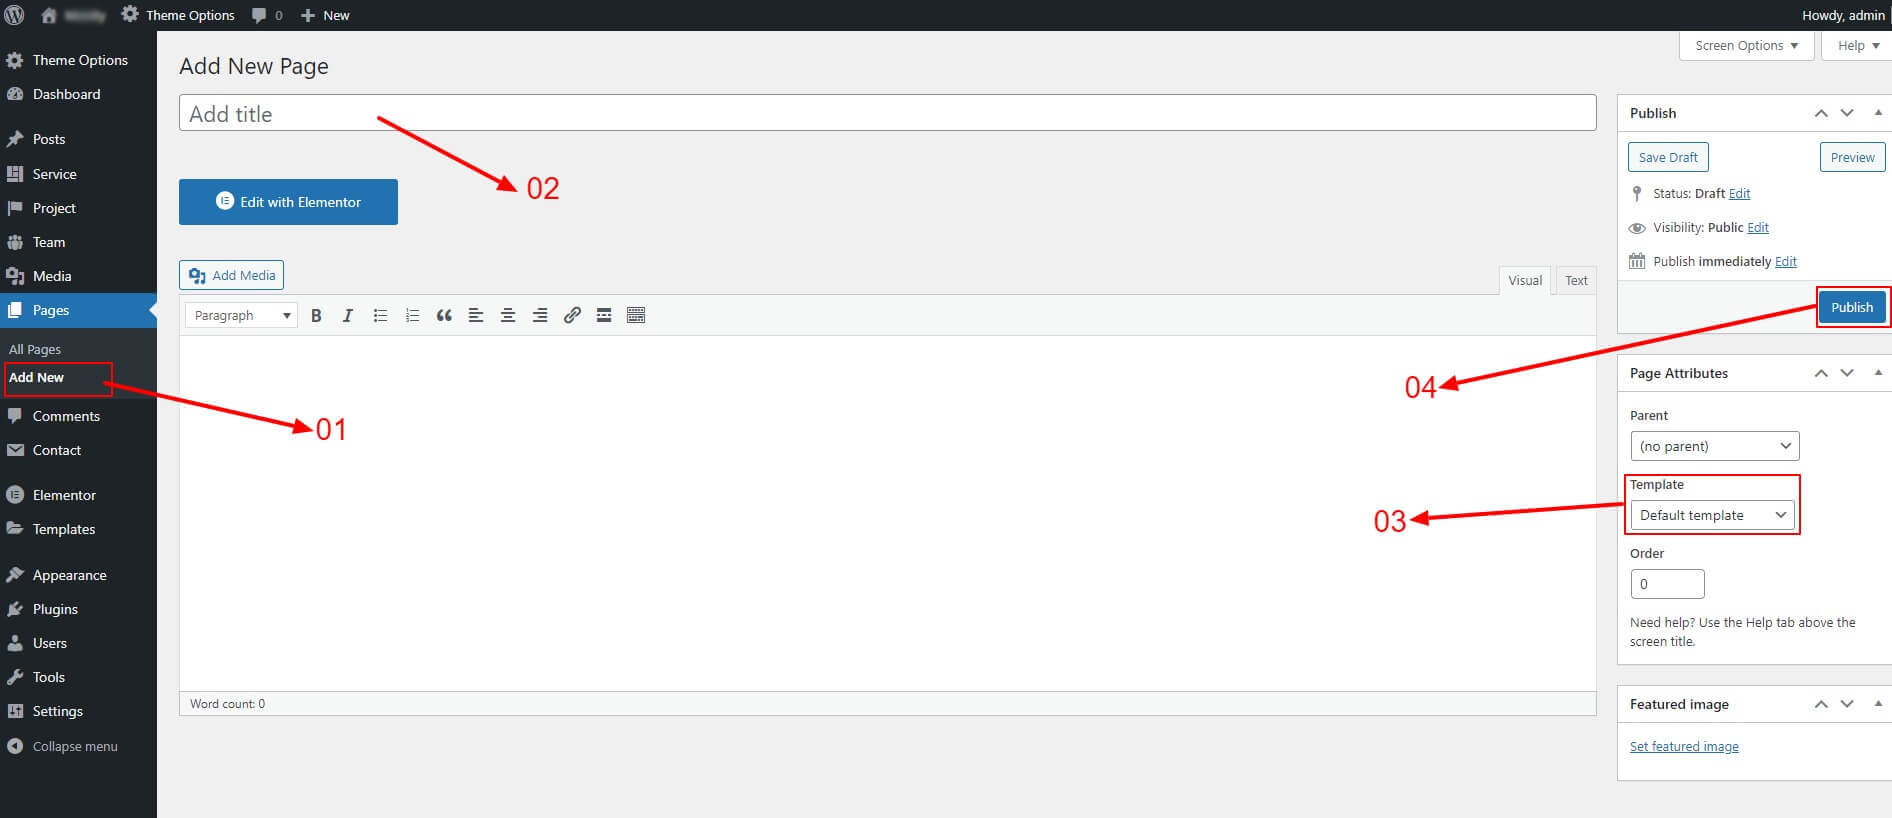
Step 1: Pages > Add New
Step 2: Add page title
Step 3: Set your parent and Template
Step 4: Click Publish
Use Elementor To Build Page
Step 1: Choose Edit With Elementor to edit your page.
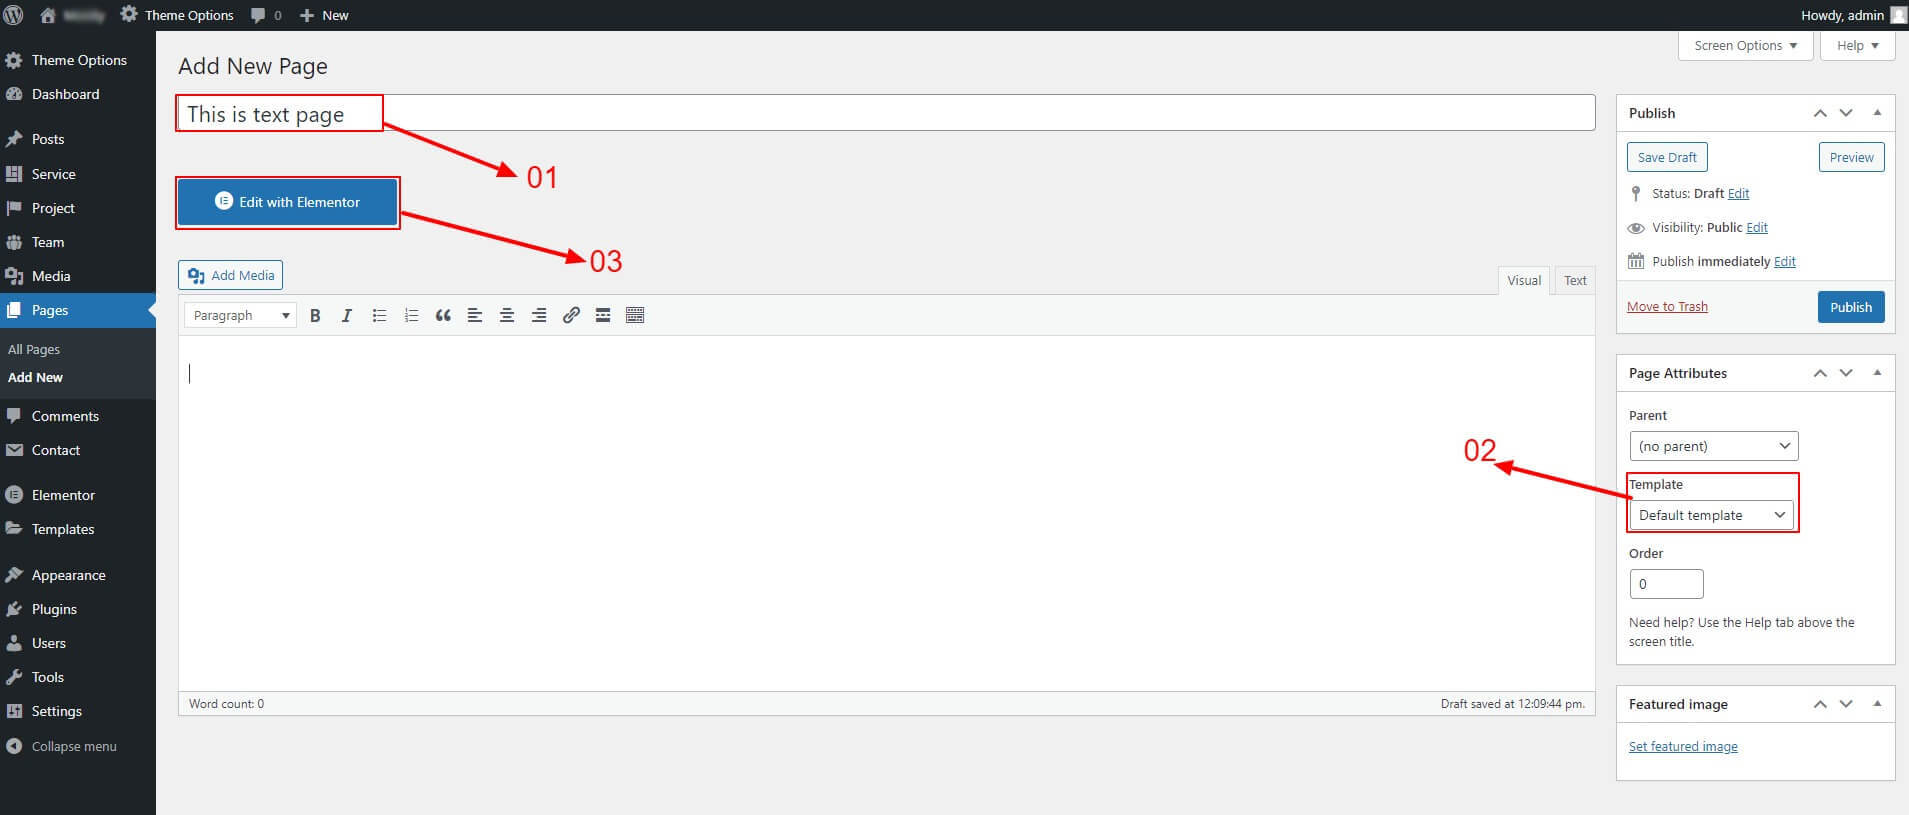
Step 2: Choose Add Element to start adding our premade elements to your new page.


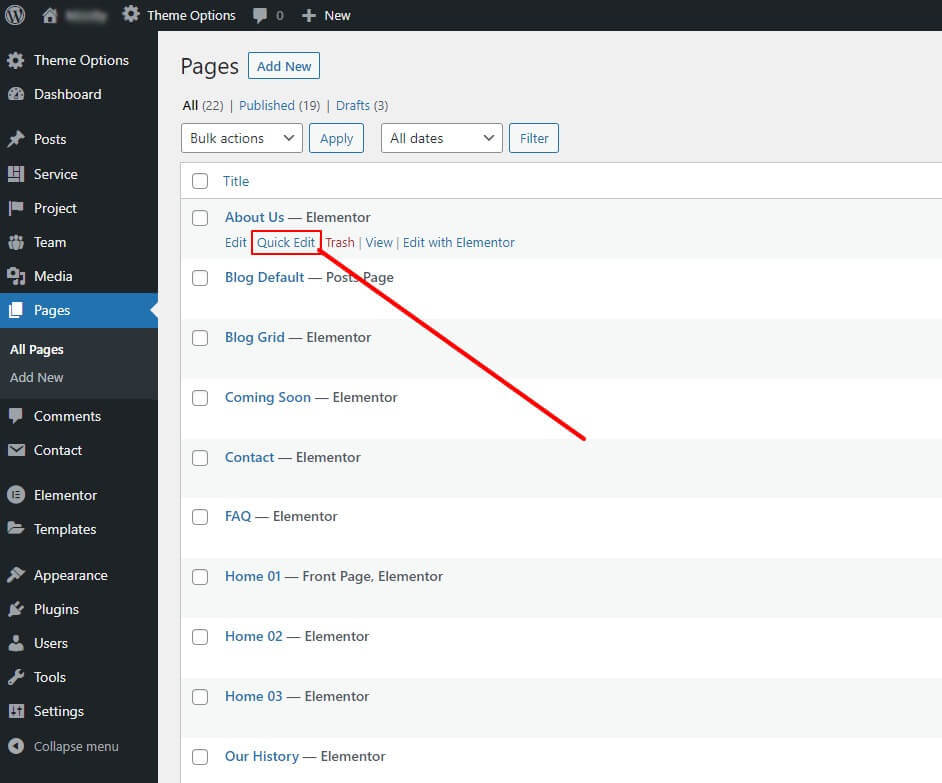
How to Change Page Title
Step 1: Go to Pages > All Pages. Then point at the page you want to edit. Then click Quick Edit option.
Step 2: Edit the title as you want. Delete the current slug. Then click Update.
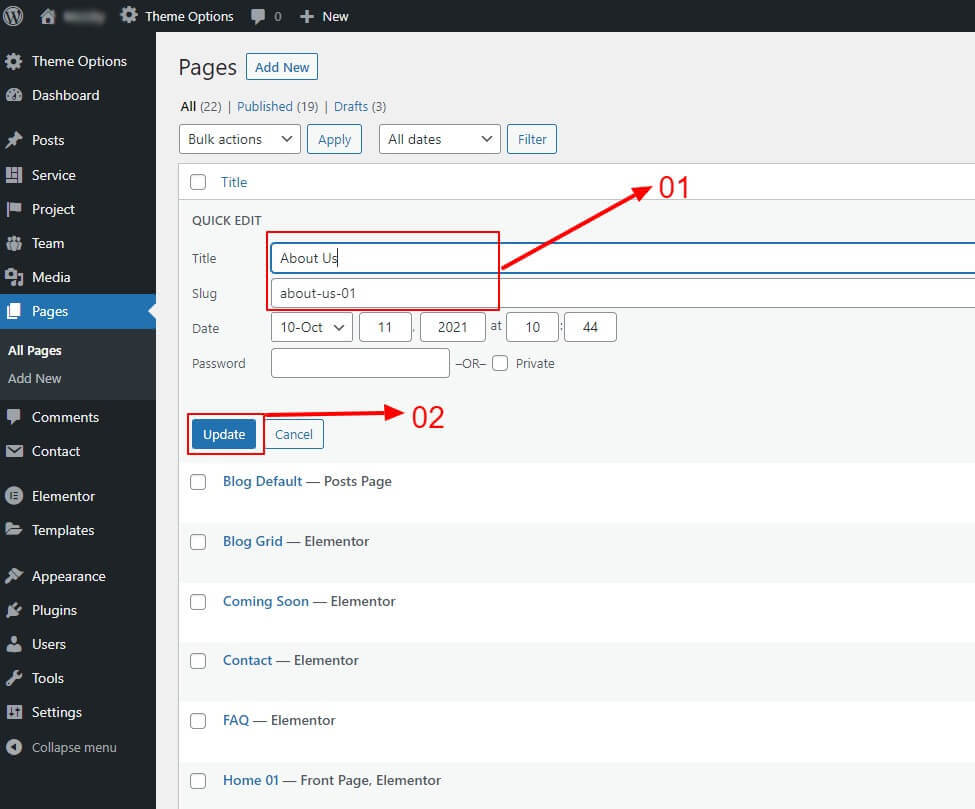
You can also edit some other options. If you want to edit more options, click Edit instead of Quick Edit.
Post
How To Create Post, Project, Team, Service
Step 1: Navigate to Posts in your WordPress admin.
Step 2: Click on Add New to make a new post. Create a title and insert your post content in the editing field. You can use any of our short code builder elements inside the post.
Step 3: Add Categories from the right side. To assign it to the post, check the box next to the Category name.
Step 4: Add Tags from the right side. Type the name of the tag in the field, separate multiple tags with commas.
Step 5: For a single image, click the first Featured Image Box, select an image and click “Set Featured Image”.
Step 6: Once you are finished, click Publish to save the post.
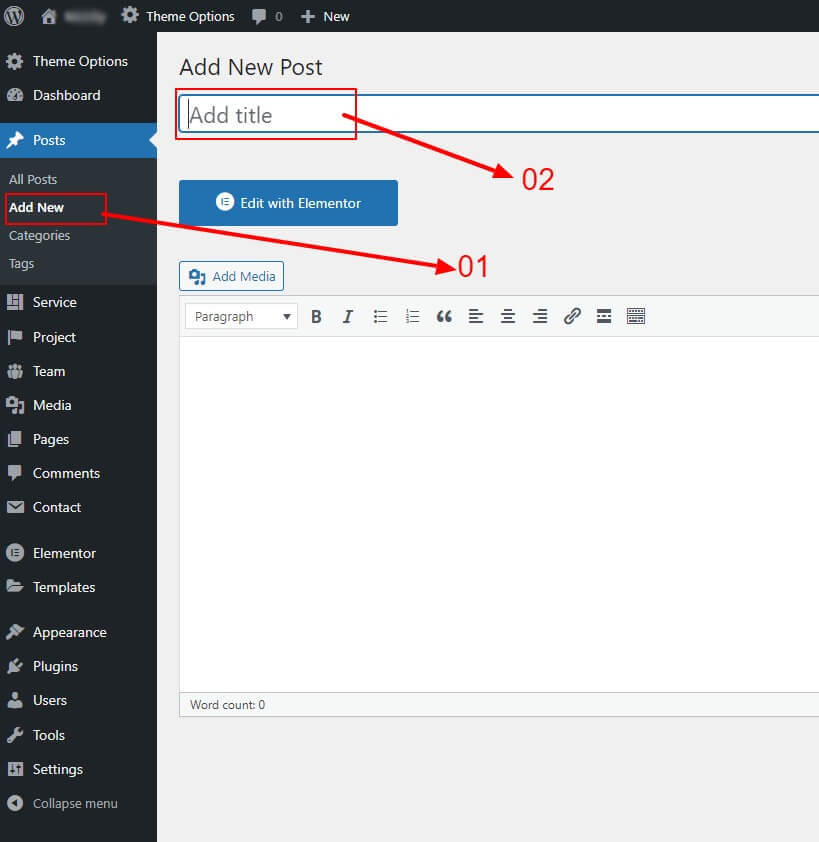
Note: Similar to post you can create service, team, project in the same way.
How To Create Category
Step 1: Post > Categories
Step 2: Name the category and fill to other section below.
Step 3: click Add New Category. Your new Category will aprear in the table of all category immediately.
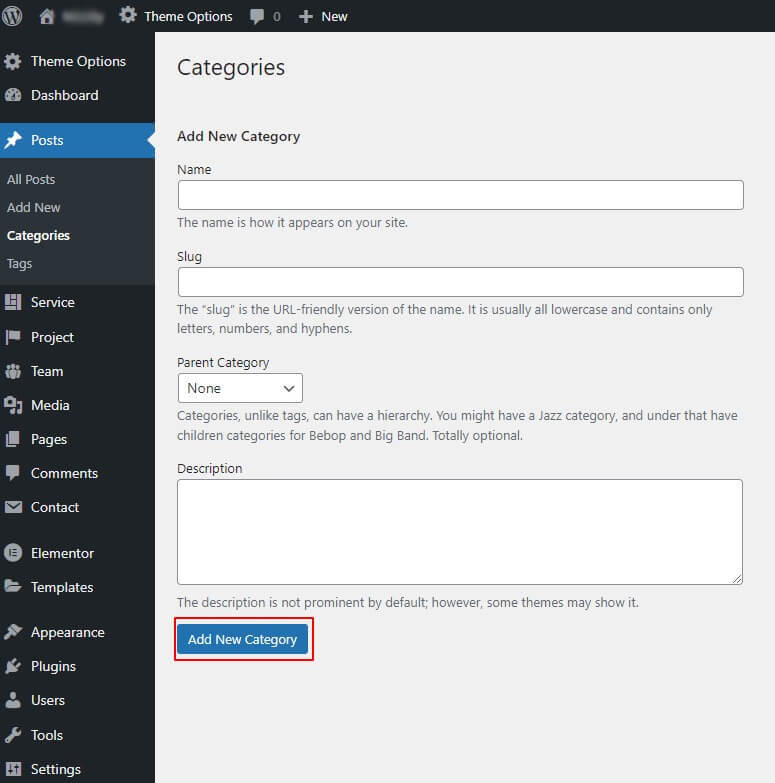
Similar to Category, you can create a new Tag in the same way.
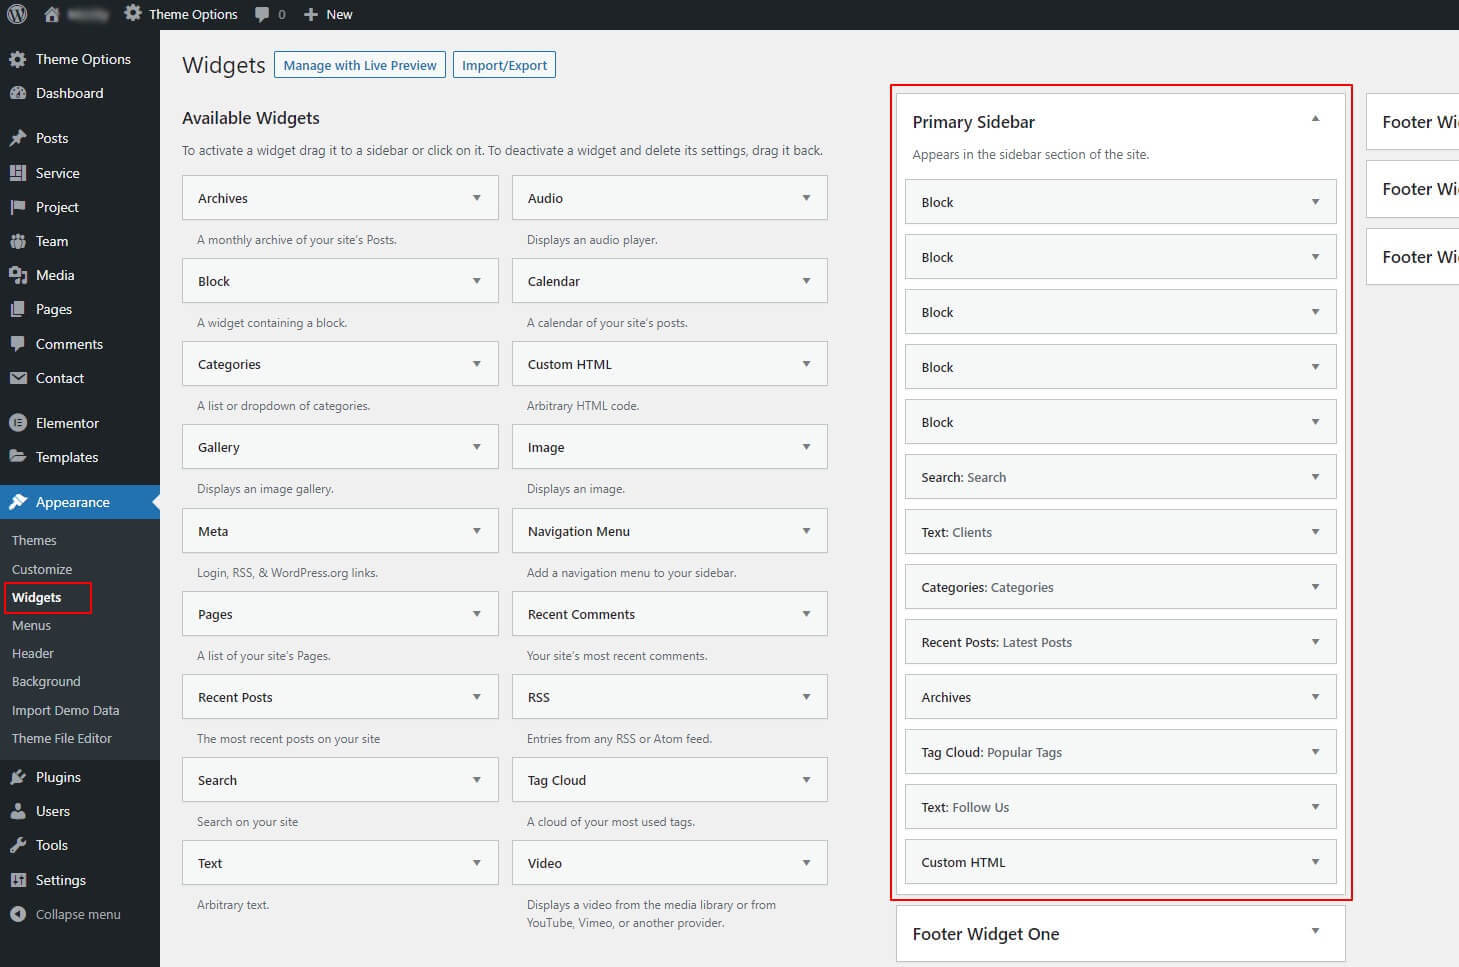
Widgets
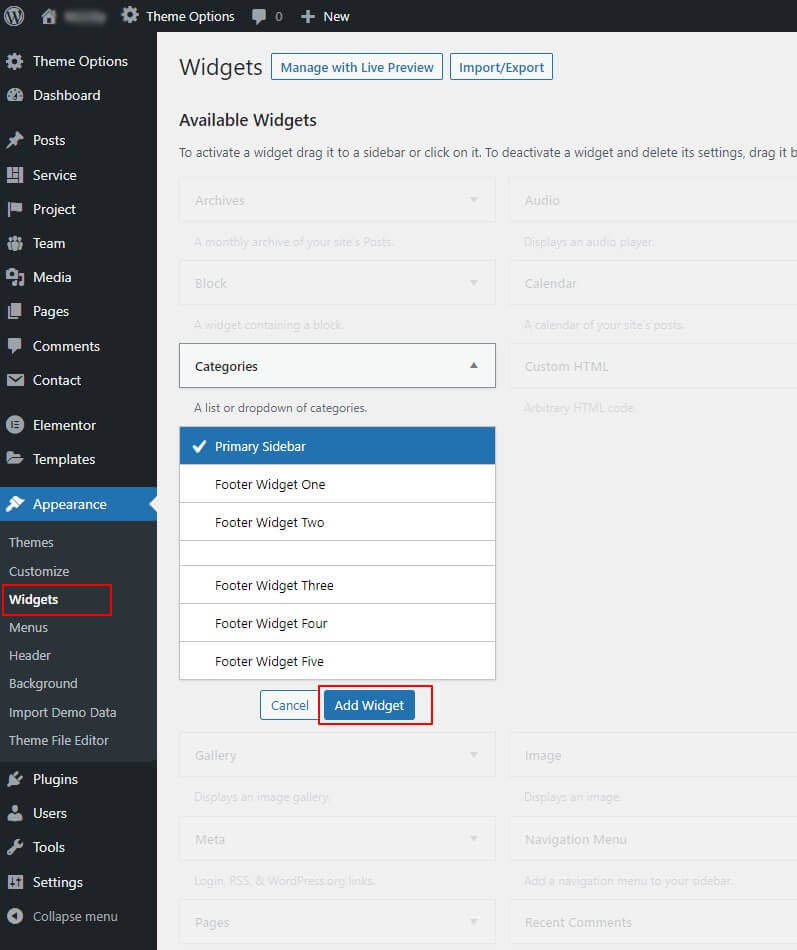
How To Add Widgets In Sidebar
Step 1: Appearance > Widgets. You can see all of the Sidebar here.
Step 2: Choose the Widgets you want and drag it to the Sidebar you want or click on it to choose the Sidebar.
In the case you want to delete its settings, drag it back.
How To Edit Widgets
1. click Appearance > Widgets. Choose a widget you want to edit.
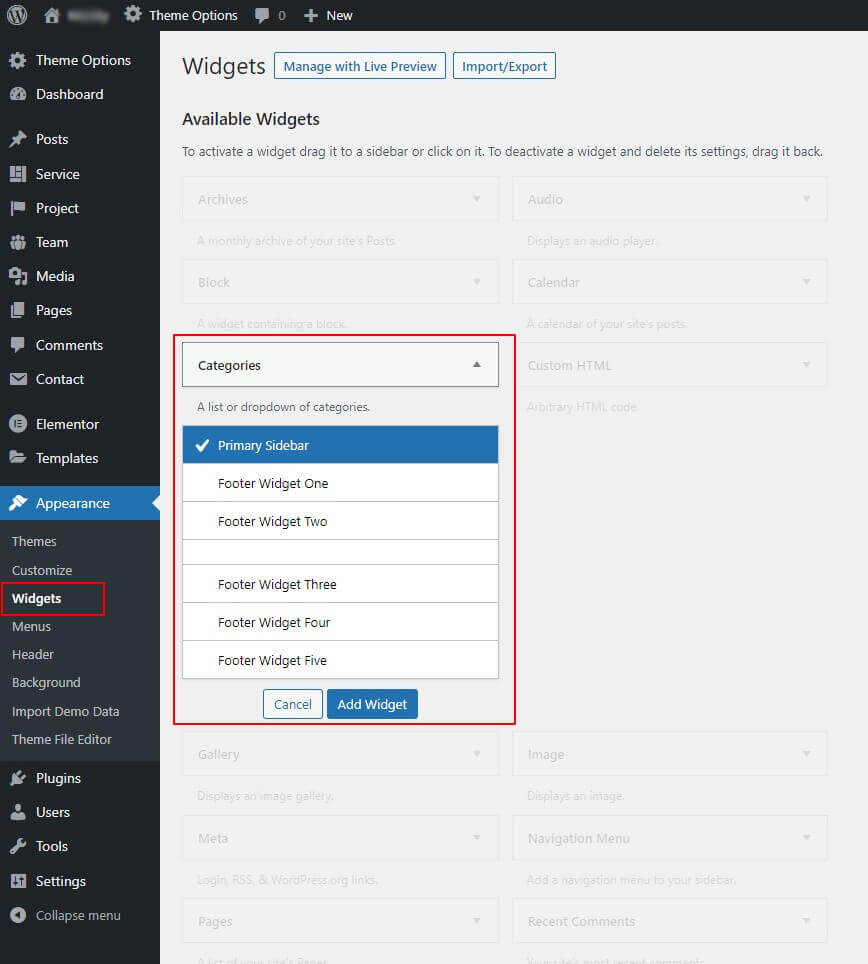
2. Then choose its area as you wish and click Add Widget.
Then go to the right where you will notice a just-added widget. Type information and click Save.
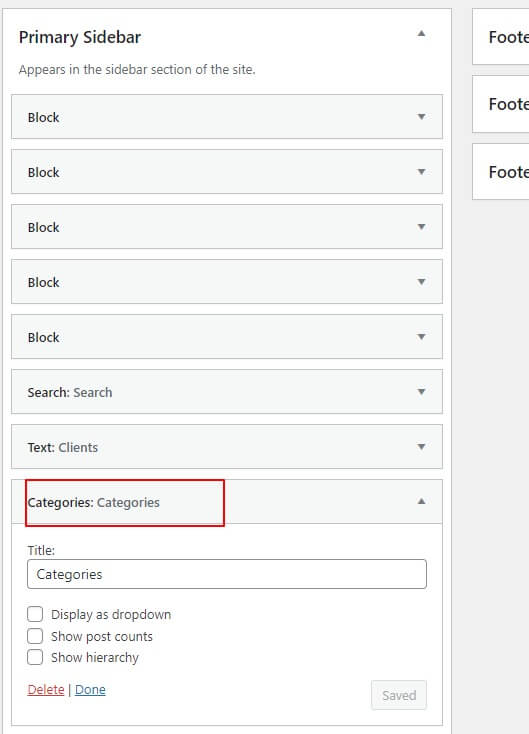
Finally Widget setup done. See your site now
Form
For contact form we have used Contact Form 7 plugin
With this plugin you can easily get email from your visitor. To setup a contact form go to Contact>Add New after that you have to add necessary field and email settings to get the job done. In our theme demo we preloaded a contact form with necessary field and settings with that you can easily do your site.
Contact Form
<div class="quform">
	<div class="quform-elements">
		<div class="row">
			<div class="col-md-6">
				<div class="quform-element form-group">
					<div class="quform-input">[text* your-name class:form-control placeholder "Your name here"]</div>
				</div>
			</div>
			<div class="col-md-6">
				<div class="quform-element form-group">
					<div class="quform-input">[email* your-email class:form-control placeholder "Your email here"]</div>
				</div>
			</div>
			<div class="col-md-6">
				<div class="quform-element form-group">
					<div class="quform-input">[text* your-subject class:form-control placeholder "Your subject here"]</div>
				</div>
			</div>
			<div class="col-md-6">
				<div class="quform-element form-group">
					<div class="quform-input">[number your-phone class:form-control placeholder "Your phone number here"]</div>
				</div>
			</div>
			<div class="col-md-12">
				<div class="quform-element form-group">
					<div class="quform-input">[textarea* your-message class:form-control placeholder "Tell us a few words"]</div>
				</div>
			</div>
			<div class="col-md-12">
				<div class="quform-submit-inner">[submit class:butn class:style-one class:fill "Send Message"]</div>
			</div>
		</div>
	</div>
</div>
Subscribe Form
<div class="quform newsletter-rounded w-95 w-sm-90 mx-auto ml-lg-0 newsletter-butn-icon">
	<div class="quform-elements">
		<div class="row">
			<div class="col-md-12">
				<div class="quform-element m-0">
					<div class="quform-input">
						[email* your-email class:form-control class:rounded-pill placeholder "Subscribe with us"]
					</div>
				</div>
			</div>
			<div class="col-md-12">
				<div class="quform-submit-inner">
					[submit class:btn class:btn-white class:text-primary class:m-0 class:px-4 class:border-0 "Send"]<i class="fas fa-paper-plane text-primary"></i>
				</div>
			</div>
		</div>
	</div>
</div>
Support
Did not find an answer?
If you did not find an answer to your question, please feel free to contact us.
Email: websitelayout3@gmail.com
ThemeForest Account: WebsiteLayout
Changelog
Version 1.5 – 21th June, 2025
- - UPDATED: Import Settings
- - UPDATED: Image Hover Effect
- - UPDATED: Page Formatting and Commenting
- - UPDATED: Latest Bootstrap Version
- - UPDATED: Section Title Size
- - UPDATED: Elementor Custom Widget
- - UPDATED: Service Sidebar
- - Compatible with Latest WordPress Version
- - Compatible with Latest Plugins
Version 1.4 – 24th February, 2025
- - UPDATED: Demo Import Settings
- - Compatible with Latest WordPress Version
- - Compatible with Latest Plugins
Version 1.3 – 10th December, 2024
- - Compatible with Latest WordPress Version
- - Compatible with Latest Plugins
Version 1.2 – 05th September, 2024
- - NEW: - WooCommerce
- - NEW: - WPML Compatible
- - NEW: - Smooth Scroll
- - UPDATED: Font Family
- - UPDATED: Theme Options
- - UPDATED: Click to Top Button
- - UPDATED: Counter
- - Compatible with Latest WordPress Version
- - Compatible with Latest Plugins
Version 1.1 – 15th February, 2024
- - NEW: Demo - Home 06
- - NEW: Demo - Home 07
- - NEW: Demo - Home 08
- - UPDATED: Widgets
- - UPDATED: Theme Options
- - Compatible with Latest WordPress and Plugins
- - Elementor Through Design Options Added for Footers
- - Header & Footer Settings Updated in the Theme Options
Version 1.0 – 14th December, 2023
- Initial Release